Saturday, June 16, 2012

Easy BBQ Pulled Pork

Are you still looking for a last minute meal idea to make for Father's Day?  Do you have people coming over and have no idea what to make?  I know this pulled pork would be a hit with adults and kids, not to mention it is so easy to throw together and although my recipe is for a small portion, you can easily make it into a large batch.  This is the perfect way to feed a large crowd.  You could even make this right now if you wanted and re-heat it tomorrow.  It still tastes just as amazing the next day, heck, it might even be better!  Say goodbye to dry and flavorless pork, because this pork is so tender and juicy and it makes my mouth water just thinking about it.

Easy BBQ Pulled Pork
from: Jenn@eatcakefordinner
(Printable Recipe)

1 1/2 Lbs. boneless country style ribs
1 can beef broth
favorite barbeque sauce
 (we like to mix Sweet Baby Rays and Famous Daves)

Rub:
1 Tbl. brown sugar
1/4 tsp. salt
1/4 tsp. black pepper
1/4 tsp. dry mustard
1/4 tsp. cumin
1/2 tsp. lemon pepper
1/2 tsp. garlic powder
1/2 tsp. onion powder
1/2 tsp. chili powder
1/2 tsp. smoked paprika
    
Trim pork of any excess fat.  Combine all rub ingredients and rub over every last inch of the pork.  Refrigerate for at least several hours or overnight.  Add pork to a large dutch oven and add the can of beef broth.  Bring up to a simmer, cover, and transfer to a preheated 225 degree oven.  Cook for 1 1/2 hours.  Increase temperature to 300 degrees and cook another 45 minutes - 1 hour or until pork easily pulls apart with a fork.  Transfer pork to a mixing bowl and shred, adding some of the cooking liquid to help it stay juicy.  Stir in barbeque sauce, however much you like.  (We add about 3 Tbl. of the cooking liquid and 1/2 cup of barbeque sauce).  Drain remaining cooking liquid and add the pork back to the pot and keep warm or serve right away on toasted hamburger buns.  Serves 4-5 people.  

You could use a different cut of pork if you like.  A pork shoulder makes great pulled pork, and since those usually come in large sizes, it would work great for a crowd.  It will take a lot longer to cook (8-10 hours in a slow cooker or a few hours less in the oven), so just make sure to adjust your cooking time accordingly.

On The Side

For Dessert

Wednesday, June 13, 2012

Maple Texas Sheet Cake

Since Grammy's Sheet Cake is the most requested dessert in my house right now and has been for the last few months, I figured I would venture into trying other sheet cake recipes.  The blog where I found this one says it tastes like a maple bar and I love the flavor of maple bars.  

It turned out so moist and light and the texture is perfect.  I added chopped pecans to half and left the other half plain and I MUCH prefer it with the pecans.  It seemed pretty sweet to me without the pecans, so I highly recommend adding them to help cut all the sweetness.

If you have maple lovers in your family, I think this cake would be a hit.
Maple Texas Sheet Cake
adapted from: Singing with Birds 

3/4 c. butter
1 c. water
1 1/2 c. sugar
2 c. all-purpose flour
1 tsp. salt
1 tsp. baking soda
2 eggs
1/2 c. sour cream
1 1/2 tsp. maple extract

Icing:
1 c. butter
6 Tbl. evaporated milk
4 1/2 c. powdered sugar
1/2 - 1 tsp. maple extract, to taste
1/8 tsp. salt
1 c. chopped pecans or walnuts

Preheat oven to 375 degrees.  Melt butter and water in a large saucepan over medium-low heat until butter is melted.  Remove from heat and stir in the sugar, flour, salt and baking soda.  Stir with a wire whisk until smooth. Add eggs, sour cream and maple extract and stir until blended.  Pour the batter into a well greased 11''x17'' sheet pan.  Bake for 18-20 minutes or until the cake springs back when lightly touched or a toothpick inserted in center comes out clean.  Remove cake from oven and allow to cool slightly while you make the icing.  Put the butter and milk into a medium saucepan.  Heat until butter is melted and bring to a simmer.  Remove from heat and stir in the powdered sugar, maple extract and salt.  Whisk until completely smooth.  Spread over cake and top with chopped nuts.

Jenn's Notes:  I used a lot less maple extract than the recipe called for, because I didn't want it to be overpowering and instead just wanted a light maple flavor.  I added 1/2 tsp. maple and 1 tsp. vanilla to the cake and I added 1/2 tsp. maple and 1/2 tsp. vanilla to the icing.  I let my cake cool completely before I added the icing.  

Monday, June 11, 2012

Crunchy Potato Wedges . . . better than that fried chicken joint!

I just found the perfect recipe for Better than KFC's Crunchy Potato Wedges and I couldn't wait one second longer to share them with all of you!  

I was going to be healthy and make Oven Baked Steak Fries, then I turned on an episode of Cook's Country and they are the ones that had to go and bring out a box of KFC Potato Wedges and claim their recipe is even BETTER.  Don't they know that I LOVE those potato wedges.  

You see . . . I used to live on those wedges in highschool (along with bread and cinnamon sticks).  I had a very balanced diet.  I would go there and order a box of potato wedges and eat that for dinner.  They were/are the best fried potato around.  So, how do you expect me to resist a recipe that claims to be better?  

Well . . . . they turned out sooooooo good!  The outside was super crunchy (thanks to the double coating) and that spice mixture really tasted like the real deal while the potato inside was perfectly cooked (thanks to microwaving them first).  I was so impressed with this recipe and they definitely rival the real thing.

If you click on this link you can watch the episode where they made these!
Crunchy Potato Wedges
1 1/2 Lbs. russet potatoes (about 3 large)
4 tsp. kosher salt
1/2 tsp. black pepper
2 tsp. onion powder
1 tsp. garlic powder
1 tsp. dried oregano
3/4 tsp. cayenne (I only used a pinch)
1/4 c. vegetable oil
1 1/2 c. all-purpose flour
1/2 c. cornstarch
1 c. buttermilk
1/2 tsp. baking soda
3 quarts vegetable or peanut oil

Wash and dry the potatoes.  Cut each potato in half lengthwise, then each half in half, then each quarter in half, making 8 wedges per potato.  Place wedges in a large glass bowl.  Combine kosher salt, pepper, onion powder, garlic powder, dried oregano and cayenne.  Add 4 teaspoons of the spice mixture along with 1/4 cup of vegetable oil to the potatoes and toss to coat each potato evenly.  Cover bowl tightly with plastic wrap and microwave for 7-9 minutes (I did 7) until the potatoes are tender, tossing the potatoes occasionally to ensure even cooking.  Using oven mitts, carefully remove hot bowl from microwave and discard plastic wrap.  Turn out potatoes onto a baking sheet and allow to set for 10 minutes, so the potatoes can firm up.  

Combine flour and cornstarch in a medium sized dish and combine the buttermilk and baking soda in another medium sized dish.  Heat vegetable oil in a large dutch oven to 340 degrees.  Take half of the potatoes and toss in the dry ingredients, then wet, then dry again, making sure to shake off any excess flour.  Add to hot oil and cook for 4 - 6 minutes or until golden brown.  Using tongs, remove to a paper-towel lined plate and sprinkle with a little spice mixture.  Repeat with remaining potatoes.

Jenn's Notes:  Make sure to shake off the excess flour or your coating will be very thick.  I didn't do a very good job of that and ended up with a pretty thick coating, but they were still amazing.  I recommend cooking the potatoes in three or four batches rather than two.  My first batch, I added half and it lowered my oil temperature a huge amount, so it took longer than 4-6 minutes to cook.  The next few batches, I added less potatoes and they cooked a lot more evenly.  These turned out so good, even for someone that doesn't know how to deep-fry very well!  They were great plain and dipped in ranch dressing (just how I used to eat them)! 

Saturday, June 9, 2012

Easy Baked Ziti with Cottage Cheese

I have made this recipe several times and I think it is fast and easy and tastes delicious.  If you'd like, you can throw in whatever you have leftover in your fridge . . . chopped olives, fresh spinach, chopped onion, peppers, parsley, etc . . . You could even switch up the cheese if you wanted.

I like to keep several containers of my homemade spaghetti sauce in the freezer for quick weeknight dishes.  So, if you have done the same thing, this will be the easiest ziti you have ever made.  All you would have to do is get your sauce out of the freezer (remember it already has the meat in it), cook the pasta, stir together with the cottage cheese and Mozzarella and anything else you might want to add, bake and eat.  Is that easy enough for you?  I have also made this using store-bought sauce and ground beef and it tastes great too, it will just take a few extra minutes to cook the meat, which isn't a big deal, because you will be cooking the pasta anyway.  Serve with some soft and chewy French Bread or garlic bread on the side! 
Easy Baked Ziti with Cottage Cheese
8 oz. ziti or rigatoni, cooked and drained
8 oz. Mozzarella cheese, shredded
1 c. cottage cheese
1 jar (approx. 24 oz.) spaghetti sauce or homemade
salt and pepper (if using store-bought sauce)
1 tsp. italian seasoning (if using store-bought sauce)
1/2 Lb. ground beef, cooked (if using store-bought sauce)


In a large bowl, combine all the ingredients (reserving a little Mozzarella for topping) and mix well.  Pour into a greased 8x8 casserole dish.  Top with remaining cheese.  Bake at 350 degrees for 30 minutes or until heated through and sauce is bubbly.  Serves 4-5.


Jenn's Notes:  If you use my homemade sauce that already has the meat and all the seasonings in it, I would use around 2 1/2 - 3 cups.  It will just depend on how saucy you like your pasta.  

Wednesday, June 6, 2012

Nutella No Bake Cookies

No Bake Cookies are one of those cookies that I could eat EVERY SINGLE DAY.  I have been eating them as long as I can remember and I still have never gotten sick of them.  The funny thing is, that I had been craving no-bakes for the past few weeks, but I never made them, because I thought - no one wants to see the same old no bake recipe.  Then, last night I found NUTELLA NO BAKE COOKIES!  For real!!!

What a fun twist on an old classic.  I crossed my fingers that I still had enough Nutella left in the jar - oh and I did, but only for a half a batch.  But hey, better than nothing.  They turned out delicious.  So creamy and chewy just how I like them.  We ate these things so fast and I only have one left.  I want to try them with all Nutella and no peanut butter just to see if the hazelnut flavor will stand out a little more.  Either way, they are super yummy.

Nutella No Bake Cookies
adapted from: Shugary Sweets
2 c. sugar
1/4 c. unsweetened cocoa powder
1/2 c. milk
1/2 c. butter
1 tsp. vanilla
pinch of salt
1/4 c. creamy peanut butter
1/4 c. Nutella
3 c. quick-cooking oats

In a medium saucepan, combine the sugar, cocoa powder, milk and butter.  Cook over medium heat, stirring until the butter is melted and sugar is dissolved.  Bring to a boil.  Remove from heat and stir in the vanilla, salt, peanut butter and Nutella.  Last, stir in the oats and quickly drop by spoonfuls onto wax paper.  Allow to harden and enjoy!  

Monday, June 4, 2012

Spicy Chicken and Pepper Jack Pizza


This pizza quickly caught my attention, because I love every single ingredient involved.  Well, at least I love all of those ingredients in tacos?  But a pizza, sounds interesting.  It uses salsa in the same way you would pizza sauce and is topped with peppers, shredded chicken and spicy Pepper Jack cheese (which I absolutely love) and you finish it all off with chopped cilantro.  I love spicy things and I thought this was just right.  The Pepper Jack cheese has a little kick to it, but the rest of the spice is going to depend on the salsa you use.  
I really liked how it turned out and I would make it again, but next time I want to try it with some kind of creamy white garlicky sauce in addition to the salsa.  I think that would make this an AMAZING gourmet pizza.  If anyone has a recipe for a creamy white pizza sauce (not alfredo) please send it my way.      
Spicy Chicken and Pepper Jack Pizza
(Printable Recipe)
**These measurements are estimates.  Depending on the size of pizza you make, you may want to adjust the ingredients to your desired taste.
1 batch pizza dough
3/4 - 1 c. homemade salsa
1/2 - 3/4 c. diced red and/or green bell pepper 
1 1/2 c. cooked chicken, shredded 
2 c. Pepper Jack cheese, grated
chopped cilantro, for garnish

On a lightly floured surface, roll out pizza dough into desired size.  I roll the dough fairly thin, because it puffs up a lot while baking.  Transfer dough to a greased baking sheet.  Bake in a 425 degree preheated oven for 8 minutes.  Remove from oven and top dough with an even layer of salsa (like you would pizza sauce), diced peppers and shredded chicken.  Then, sprinkle cheese evenly over the top.  Return to oven and bake another 10-12 minutes or until crust is browned and cheese is melted and bubbly.  Remove from oven, garnish with chopped cilantro, slice and serve.  

If using a pizza stone (What I do):  Place pizza stone in a cold oven. Preheat to 500 degrees.  Meanwhile, on a lightly floured surface, roll out pizza dough into desired size.  I roll the dough fairly thin, because it puffs up a lot while baking.  Transfer dough to a pizza peel that has been lightly dusted with cornmeal (this is so the pizza will slide off easily).  Spread salsa evenly over pizza dough (like you would pizza sauce).  Then, top with chopped bell peppers and shredded chicken.  Last, sprinkle cheese evenly over the top.  Transfer pizza from pizza peel onto preheated pizza stone and turn the oven temperature down to 425 degrees.  Bake for 10-15 minutes or until crust is nicely browned and cheese is melted and bubbly.  Very carefully, using a spatula, slide pizza back onto pizza peel, garnish with chopped cilantro, slice and serve.   

Jenn's Notes: I baked my chicken with a few dashes of Worcestershire and hot sauce and sprinkled with some Italian seasoning.  


Slightly adapted from: Baking with Blondie    

Saturday, June 2, 2012

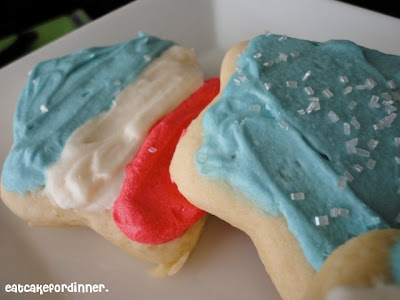
Red, White and Blue Old Fashioned Sugar Cookies

Since I am always a procrastinator when it comes to posting Holiday Themed treats, I figured I would get a jump start on the next one.  The Fourth of July is only a month away! Can you believe it is already June?

We went to a BBQ the other day and I wanted to bring something red, white and blue and since I love anything and everything slathered in frosting, I went with sugar cookies!  I have made this recipe twice now and I am still not sure what makes them Old-Fashioned.  They are big and soft,  yet chewy at the same time.  By the way, does anyone know the secret to getting something to actually turn red and not pink?       

If you don't feel like trying this old fashioned version, here are a few other yummy sugar cookie recipes Kneader's Sugar CookiesNo Roll Sugar Cookies and Soft Cookies with Pink Icing.
My original plan was to pipe the frosting onto each cookie, so my stripes would be straight and look clean, but I decided I wanted to try a regular old butter knife,  that way anybody could make these without needing any fancy equipment.  I think they turned out okay, they look homemade, right?  I used glitter crystal sprinkles for the "stars" on the flag, which was a nice finishing touch.  They were super easy and the taste delicious!   
Old Fashioned Sugar Cookies
1/2 c. unsalted butter
1 c. sugar
2 large eggs
1 tsp. vanilla extract
3 c. all-purpose flour
1/2 tsp. salt
1/2 tsp. baking soda
1/2 tsp. cream of tartar
1/2 c. evaporated milk or whipping cream

Cream together butter and sugar until light and fluffy.  Add the eggs, one at a time, beating well after each.  Mix in the vanilla.  Sift together the flour, salt, baking soda and cream of tartar.  Add dry ingredients alternately with milk/cream and mix well.  Chill dough for three hours or overnight.  Roll out to 1/4''-1/2'' thick.  Cut into desired shapes and place on a parchment lined cookie sheet.  Bake at 350 degrees for 8-10 minutes (mine took 12).  Cookies will not brown, but the top should spring back when lightly pressed when they are done.  

Jenn's Notes: My first batch, using whipping cream, I baked until the top kind of sprung back when lightly touched and that took 12 minutes.  The 2nd batch, using evaporated milk, I baked them 12 minutes and they were slightly underdone, so I must have rolled them thicker than the first time.  So, you'll just have to do the best you can to tell when they are done.  I made all kinds of shapes and sizes and I think I got around 30 cookies or so.    


Vanilla Frosting
from: Jenn@eatcakefordinner
1 c. unsalted butter, softened
2 oz. cream cheese, softened, opt.
pinch of salt
2 tsp. vanilla extract
3 c. powdered sugar
2-3 Tbl. heavy cream or milk


Cream together butter and cream cheese until smooth.  Add the salt and vanilla and mix to combine.  Gradually add the powdered sugar, one cup at a time, adding cream/milk as needed.  Beat until smooth and fluffy.  Divide between three bowls and color one blue, one red and leave one white.  Frost cookies.      

Popular Posts

that give mcdonalds coupons and 
breakfast coupons you also can find recipe from