Saturday, December 15, 2012

Eggnog Coffee Cake

Did you guys notice my profile picture?  I mean MY actual picture and NOT a picture of a cupcake.  
This is a HUGE milestone for me.  My very first picture on the internet. WOW.  I am always behind the times with social media and the newest and greatest gadgets.  You would think I was an old-timer (no offense) and not a twenty-something chick.  Just when I am getting comfortable with something, it changes.  That is why I prefer leaving things the way they are.  Afterall, I do still have the FIRST GENERATION iPhone.  Is that considered vintage :)  

I think I might have been one of the last people in the world that didn't have a Facebook account and I finally signed up this past February.  Then, someone told me that I really needed to update my profile to show a picture of myself.  People need pictures in order to connect with you and no one can relate to an "avatar" icon.  A few months went by while I contemplated this.  That was my next step, but did I really want my picture out on the internet for everyone to see?  Then, I finally realized . . . who cares?  Everyone's pictures are out there for the whole world to see, what is the big deal?

I logged in, updated my pic and stared at it for a few minutes before I finally dared click the "save" button.  OMG - I did it!  I opened up my blog to now see a girl and not a cupcake.  Okay, I guess it wasn't so bad.  One step at a time, I am slowly getting up to speed with the world around me :)      

Now, onto the Coffee Cake.

It turned out yummy.  The cake is very heavy and dense and it's loaded with eggnog flavor, not only because of the eggnog (duh), but from the nutmeg and rum extract too.  The best part is that you prepare the cake batter the night before and keep in the fridge overnight.  That way, when your kids (or DAD if you are in my family) wake you up super EARLY Christmas morning and you are still half asleep, you don't have to worry about missing some ingredients.  All you have to do is preheat the oven and bake the already prepared cake!

Eggnog Coffee Cake
1 c. sugar
1/2 c. butter or margarine, softened
1 c. eggnog
1 container (8 oz.) sour cream (I used plain yogurt)
1 tsp. rum extract
2 eggs
2 1/2 c. all-purpose flour
1 1/2 tsp. baking powder
1/2 tsp. baking soda
1/2 tsp. salt

Streusel Topping
1/3 c. sugar
1 Tbl. all-purpose flour
1 Tbl. butter or margarine
1/2 tsp. ground nutmeg

Grease a 9x13-inch rectangle pan; set aside  Cream together sugar and butter until light and fluffy.  Add the eggnog, sour cream, rum extract and eggs and beat until well incorporated.  Mix in the flour, baking powder, baking soda and salt until blended.  Spread evenly in prepared pan.  In a small bowl, combine the streusel topping ingredients and mix with a fork until crumbly (I used my hands).  Sprinkle streusel topping over batter.  Cover and refrigerate at least 8 hours.  Heat oven to 350 degrees.  Uncover pan and bake 35-40 minutes or until a toothpick inserted in the center comes out clean.  Cool 20 minutes and top with eggnog glaze.  

Eggnog Glaze
1/2 c. powdered sugar
1-2 Tbl. eggnog

In a small bowl, mix powdered sugar and eggnog until smooth and thin enough to drizzle.  Drizzle over coffee cake.  

Jenn's Notes: I cut the above recipe in half and baked in a 8x6-inch pan.  I used non-fat yogurt instead of sour cream and I made the full eggnog glaze recipe for the 1/2 batch, because I like lots of glaze.  The only thing I would do different next time, is to add the streusel topping in the morning, right before I bake it, because the sugar dissolved overnight and didn't end up being crunchy.  I would prefer it to be crunchy, but that is just my personal taste.  

Thursday, December 13, 2012

One Pan Roast Chicken with Vegetables in an Hour

OMG . . . I ate brussels sprouts . . . and I am STILL alive!

They were actually, dare I say, GOOD?

Heck, I didn't even know they were called a brussels sprout and not a brussel sprout.  Spell check kept telling me I spelled brussel wrong, which made me have to look it up and learn that wasn't even what they were called! Ha ha.

They reminded me of a cross between cauliflower and broccoli.  I WILL be eating them again, no doubt about it.  Anyone have any good recipes? 

I'll admit, if it would have been up to me, I would have just omitted them from the dish, but "The Mr." made me try them and good thing, because we both ended up liking them.  I also tried shallots in this dish for the first time and they were good, but next time I'll use a regular onion since they are a lot cheaper.  

This whole dish was delicious. It's fancy enough for Sunday dinner, yet quick enough for a weeknight dinner.  The vegetables were the star.  It took about 25 minutes of prep. work and about 35 minutes to bake.
There you have it . . . now eat those brussels sprouts!
One Pan Roast Chicken with Vegetables
3-4 bone-in, skin-on chicken breasts, cut in half
12 oz. carrots, cut into 2-inch chunks, halved lengthwise
12 oz. brussels sprouts, halved
1 lb. red potatoes, cut into 1-inch chunks, unpeeled
1/2 lb. shallots, finely chopped

For the Veggies
1/2 Tbl. vegetable oil
1/2 Tbl. melted butter
2-3 cloves garlic, minced
2 tsp. dried thyme 
1 tsp. dried rosemary
1 tsp. lemon pepper
1 tsp. sugar
3/4 tsp. salt
1/4 tsp. black pepper

Herb Butter for Chicken
3 Tbl. melted butter
2 tsp. dried thyme
1 tsp. dried rosemary
1 tsp. lemon pepper
1/4 tsp. salt
1/4 tsp. black pepper

Preheat oven to 475 degrees.  Wash, dry and prepare vegetables as directed above and place in a large bowl.  Combine all ingredients for the veggies and add to the bowl.  Toss together until evenly coated.  Spread out onto a large jelly-roll pan.  Put the brussels sprouts in the middle of the pan and surround them with the remaining veggies.  That way, they will be mostly covered by the chicken and will cook at the same rate as everything else.  Place chicken breasts on top of the veggies in the jelly-roll pan.  Combine herb butter ingredients for chicken and brush over each piece, getting under the skin and the top of the skin. Roast in the preheated oven for 35-40 minutes or until chicken registers 160-165 degrees on an instant-read thermometer.  Remove from oven and move chicken to the side of the pan.  Toss veggies with the drippings in the pan.  Serves: 3-8 people, depending entirely on if they eat one chicken breast half or two halves each.  

Jenn's Notes: The only thing I would do different next time is to try a regular onion instead of shallots, since they are a lot cheaper.  The veggies were the star of the dish.  The flavor was amazing and they were all cooked perfectly.  The chicken was juicy and had good flavor.  I will make this again!

Monday, December 10, 2012

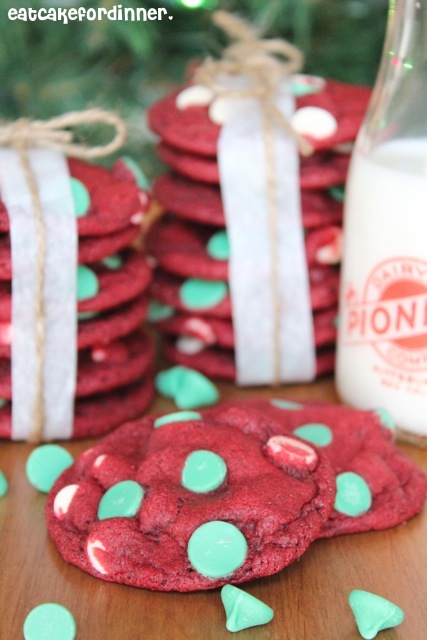
Red Velvet Cookies with Green Mint Chips

A few years ago, one of our local grocery stores was changing into another grocery store.  They had all kinds of amazing sales for the "Grand Opening".  One of those deals was Guittard Chocolate Chips, any flavor, for 99 cents.  For real, 99 cents.  Before that, I had only ever used the cheapest chocolate chips available.  My friend, Nicole, introduced me to Guittard and I have never looked back.  I picked up 30 bags or so of different chips.  

Out of all those bags, I got ONE bag of Green Mint Chips.  I had no idea what I wanted to make with them, but did it really matter?  They were 99 cents.  They sat in my freezer up until the other day.  I had a great idea for some cookies.  I needed something festive for the holidays and what screams Christmas more than red and green?  
They turned out SO STINKIN GOOD!  I am not lying here.  These are one of my new FAVORITE cookies.  The cookie is so soft and chewy with a light chocolate flavor and the mint flavor from the chips is outstanding.  The flavor reminds me of something I used to eat growing up, but I can't quite place it.  If you are a mint lover, like I am, you have got to make these cookies and I promise you will love them.  If you are not a mint lover, add all white chocolate chips instead and I promise you will love them too!

Please make these to add to your cookie plates this year :)

Oh . . . and bring me a plate while you are at it!

P.S. Luckily my local grocery store carries these mint chips all year long.  Even though these cookies are red and green, I am going to bet you will want them all year long!  I know I will.
Red Velvet Cookies with Green Mint Chips
2 1/4 c. all-purpose flour
2 1/2 Tbl. cocoa powder
1 1/2 tsp. cornstarch
3/4 tsp. baking soda
1/2 tsp. salt
7 Tbl. unsalted butter, room temperature
6 Tbl. shortening
1 1/2 c. sugar
1 egg
1 egg yolk
1 1/2 tsp. white vinegar
1 1/2 tsp. vanilla
1 Tbl. red food coloring
1/2 c. white chocolate chips
3/4 c. green mint chips

Preheat oven to 375 degrees.  Combine flour, cocoa powder, cornstarch, baking soda and salt; set aside.  In the bowl of a stand mixer, beat together the butter, shortening and sugar until very pale and light and fluffy; about 4 minutes.  Add the egg and egg yolk and mix well.  Add the vinegar, vanilla and red food coloring and mix until fully incorporated.  Slowly add dry ingredients and mix until just combined.  Stir in 1/2 cup of white chocolate chips.  Roll about 1 1/2 Tablespoons of dough into a ball and press 6 green mint chips into the top, being careful not to flatten cookie.  If cookie does get flattened, roll back into a ball.  Repeat with remaining dough.  Bake for 8-9 minutes, they will look underdone.  Yield: 3 dozen cookies.

Jenn's Notes: I ended up adding a few extra drops of red food coloring, because after I added the dry ingredients, it didn't look as red as I wanted.  I baked my cookies for 9 minutes and they were perfect.  I did chill my dough for a few hours before I got around to baking them.  These cookies are so soft and chewy and the flavor is outstanding.  I got exactly 3 dozen cookies.  I think they are best when eaten within 3 days.  

Sunday, December 9, 2012

Mini Orange Monkey Bread from Scratch with Orange Glaze


Since you guys loved my cinnamon and sugar monkey bread so much, I knew you would be dying for another version to try :)  Here is version two . . . the orange monkey bread!

I don't know about you, but I have certain family members that would rather enjoy an orange roll over a cinnamon roll and then I have the family members that would pick a cinnamon roll over an orange roll any day of the week.  Being the sweet girl that I am, I figured I could satisfy everyone and make both versions.

You can do the same for your family on Christmas morning.  Make one batch of my biscuit dough and make half with cinnamon and sugar and the other half with orange.  It's a win win situation and I say the cook gets one of each version :)

Are you a cinnamon roll lover or an orange roll lover?
Mini Orange Monkey Bread from Scratch
From: Jenn@eatcakefordinner
(Printable Recipe) or (Printable with Picture)

2 1/2 c. all-purpose flour
1 1/2 Tbl. baking powder
3 Tbl. sugar
1/4 tsp. salt
1/2 c. unsalted butter, cold
1 c. buttermilk (plus a little more, if needed)

Orange/Sugar Coating
1 c. sugar
grated zest of 1-2 oranges, to taste
1/2 c. unsalted butter, melted

Orange Glaze
1 c. powdered sugar
1-2 Tbl. fresh orange juice
1/2 tsp. orange bakery emulsion, opt.

Preheat oven to 350 degrees.  Combine flour, baking powder, sugar and salt; mix well.  Cut cold butter into cubes and add to flour mixture.  Using a pastry blender, cut in the cold butter until it resembles coarse crumbs.  Make a well in the center and slowly incorporate the buttermilk until just combined.  I use a fork at first and then I use my hands to finish mixing.  You might need to add an extra Tablespoon or two of buttermilk to get the dough to come together.  Try not to over mix the dough.

Lightly flour work surface and pat dough out into a rectangle, about 1-inch thick.  Using a pizza cutter, cut dough into around 1 - 2 inch cubes.  There is no need to be exact, it really won't matter if they are uneven.  Grease a muffin tin very well.

Combine 1 cup of sugar and grated orange zest in a small bowl.  Rub together sugar and zest with your fingers to incorporate the two together.  Add melted butter to a separate bowl.  Take a few dough cubes and toss in melted butter and then in orange/sugar mixture.  Place sugar coated cubes into muffin cups.  Add enough cubes to fill each cup.  Repeat until all dough cubes are gone.  If you have any extra sugar mixture, just sprinkle it over the top of the muffins.  

Place in oven and bake for 25-28 minutes or until lightly browned and biscuit cubes are cooked through.  Remove from oven and loosen each monkey bread from pan.  Carefully remove to a wire rack to cool.  Combine all glaze ingredients and whisk until smooth.  Add enough orange juice to reach desired consistency.  You can either drizzle the glaze over the muffins while they are warm or when they are cooled.  Yield: 12 muffins.    

Jenn's Notes:  I like a lot of orange flavor, so I added the full amount of orange zest and I added some orange bakery emulsion to the glaze (which is like orange extract).  

Friday, December 7, 2012

Mini Monkey Bread from Scratch with Vanilla Glaze

I tried to tell myself to go on a diet :)
BUT, I kept seeing post after post of yummy desserts.  It seemed like everywhere I turned, there was yummy food staring at me.  Then, the realization sunk in that it is almost Christmas and there is NO need to worry about calories during the entire month.  Yep, I decided it is a "free month" to eat all the amazing homemade candy and cookies and anything else I can shove in my mouth.  I think you should consider it a "free month" too, stop depriving yourself.  Eat that homemade caramel and divinity and drink that eggnog!  Let's wait and worry about it until January. Deal?

You might also like my Mini Orange Monkey Bread!
 That is where these monkey breads come in, they are not "light" by any means, so you might want to save them for a special occasion.  I'm thinking Christmas morning?  They taste like delicious mini cinnamon rolls, yet they are way easier to make.  I love that you can break the monkey bread apart and have little bite-sized pieces!  You can use store-bought biscuits if you prefer, but my homemade biscuits take less than 5 minutes to make.  Your choice.  
Mini Monkey Bread from Scratch
From: Jenn@eatcakefordinner
2 1/2 c. all-purpose flour
1 1/2 Tbl. baking powder
3 Tbl. sugar
1/4 tsp. salt
1/2 c. unsalted butter, cold 
1 c. buttermilk (plus a little more, if needed)

Cinnamon/Sugar Coating
1 c. brown sugar
2 1/2 tsp. cinnamon 
1/2 c. unsalted butter, melted

Vanilla Glaze
1 c. powdered sugar
1 tsp. vanilla extract
1/2 - 1 Tbl. milk

Preheat oven to 350 degrees.  Combine flour, baking powder, sugar and salt; mix well.  Cut cold butter into cubes and add to flour mixture.  Using a pastry blender, cut in the cold butter until it resembles coarse crumbs.  Make a well in the center and slowly incorporate the buttermilk until just combined.  I use a fork at first and then I use my hands to finish mixing.  You might need to add an extra Tablespoon or two of buttermilk to get the dough to come together.  Try not to over mix the dough.  

Lightly flour work surface and pat dough out into a rectangle, about 1 inch thick.  Using a pizza cutter, cut dough into around 1 - 2 inch cubes.  There is no need to be exact, it really won't matter if they are uneven.  Grease a muffin tin very well.  

Combine 1 cup of brown sugar and 2 1/2 teaspoons of cinnamon in one bowl and melted butter in a separate bowl.  Take a few dough cubes and toss in melted butter and then in the cinnamon sugar mixture.  Place cinnamon sugar coated cubes into muffin cups.  Add enough cubes to fill each cup.  Repeat until all dough cubes are gone.  If you have any cinnamon sugar mixture leftover, you can sprinkle it over the monkey breads.  

Place in oven and bake for 25-28 minutes or until browned and biscuit cubes are cooked through.  Remove from oven and loosen each monkey bread from pan. Carefully remove to a wire rack to cool.  Combine all glaze ingredients and whisk until smooth.  Add enough milk to reach desired consistency.  You can either drizzle the glaze over the muffins while they are warm or when they are cooled.  Yield: 12 muffins.

Wednesday, December 5, 2012

Chicken Enchilada Pasta

Why is it that some days I have more of a tolerance for spice than other days?  I can make something the exact same way and one day it will seem super spicy and another day not very spicy.  

For some reason, I felt like this dish was pretty spicy.  Not burn your throat and make your eyes water spicy, but make your tongue and lips tingly spicy.  As I was eating it, I was flipping through a cookbook and came across a picture of frozen hot chocolate.  Never had a frozen drink sounded so good :)  

No, it really wasn't that bad.  I would have thought it was too spicy for kids, but Mel over at Mel's Kitchen Cafe said her family loved it and her friend's kids loved it too.  So, who knows, your kids might like it?

Despite my tingly lips, I thought it was yummy and easy to make.  Perfect for a weeknight.

Chicken Enchilada Pasta
3 chicken breasts, cooked and cubed
2 Tbl. oil
1 small onion, diced
1 red bell pepper, diced
2 garlic cloves, minced
1 (4 oz.) can diced green chiles (I didn't add)
2 tsp. chili powder
1 tsp. cumin
2 (10 oz.) cans mild green enchilada sauce
2/3 c. mild red enchilada sauce
1 (6 oz.) can black olives, cut in half (I didn't add)
1 1/2 c. shredded Cheddar cheese 
1 c. sour cream
chopped cilantro, opt.
1 (16 oz.) box pasta, cooked according 
     to package directions    

Heat oil in a large skillet over medium heat.  Add the onion and red pepper and cook until tender, about 3-5 minutes.  Add the garlic and cook 30 more seconds.  Add the the cooked chicken, green chiles, chili powder, cumin, both enchilada sauces and the olives.  Let the sauce simmer for 10 minutes.  Add the cheese and stir until melted.  Stir in the sour cream and some chopped cilantro.  Once that is heated through (don't let it boil), add the cooked and drained pasta.  Serves 6.    

Jenn's Notes: I made a half a batch.  I used 1 large chicken breast, big shell pasta and I added a mixture of Cheddar and Monterey Jack cheese.  I think this dish would also be yummy with ground beef instead of chicken.  


adapted from: The Royal Cook originally from: Mel's Kitchen Cafe

Sunday, December 2, 2012

Deli Cordon Bleu Sandwich

If I am going to eat a sandwich during these cold, Winter months, it better be warm and toasty with gooey melted cheese.  This sandwich was all that and it tasted amazing. You can have it on the lunch or dinner table in a matter of minutes, which means more time to spend on that Holiday shopping most of us have left to do.  Half of us ate this with the honey mustard and the other half with the cream cheese and mayo mixture and both were delicious.  This is a keeper.  

Deli Cordon Bleu Sandwich
adapted from: Chef-In-Training
(Printable Recipe) or (Printable with Picture)

2 slices Texas Toast
3 thin slices chicken deli meat (I used golden)
3 thin slices ham deli meat (I used black forest)
2 slices Swiss cheese
2-3 slices cooked bacon
1 oz. cream cheese, softened
1 Tbl. mayonnaise
1/4 tsp. bread crumbs
or
Honey Mustard
2 Tbl. mayonnaise
1/2 Tbl. prepared mustard
1/2 Tbl. honey
3/4 tsp. lemon juice

In a small bowl, mix softened cream cheese, mayonnaise and bread crumbs together; set aside.  Or, combine all honey mustard ingredients; set aside.  Butter one side of a piece of texas toast and place butter side down on a heated skillet over medium heat.  Top with cheese, deli meat and bacon.  Take other piece of texas toast and spread cream cheese/mayo mixture or honey mustard on one side and butter on the other side.  Place on top of sandwich in the pan, butter side up. When bread is toasted and golden, carefully flip sandwich over to toast other half.  Serve.  Yield: One sandwich.

Jenn's Notes: The honey mustard will make more than you want to spread on your sandwich, but I like to serve the extra on the side to dip my sandwich in.  

Popular Posts

that give mcdonalds coupons and 
breakfast coupons you also can find recipe from