Sunday, September 30, 2012

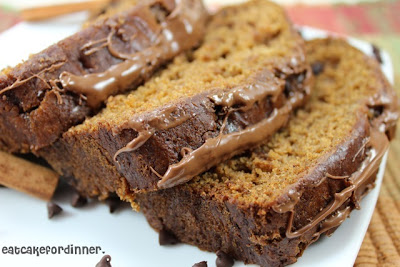
Pumpkin Chocolate Chip Bread with Chocolate Drizzle - It's Low-Fat and Amazing -

I am pretty sure this bread is my new BFF.  I can't stop raving about it.  I love it not only because it tastes so good, but it is LOW-FAT (compared to other pumpkin breads).  I promise you would NEVER KNOW IT.  The recipe only calls for 1 TABLESPOON of oil, but it is just as moist as other pumpkin breads that call for up to 1/2 cup of oil.

Now, I am questioning all my other pumpkin bread recipes, why have I been adding so much oil if it is not even needed?  I think it is time to start experimenting!  
This bread is so good by itself that it doesn't even need the chocolate drizzle on top (and it would have even fewer calories, of course).  In fact, I ate half the loaf before I even added the drizzle.  It still tasted perfect on the 4th day when I enjoyed my last slice.

This recipe also comes from my new Favorite Family Recipes Cookbook that I told you about the other day.  They said they prefer this low-fat recipe over regular recipes and I totally understand why.

You better try this so you can rave about it too!  

Hopefully by now you have already printed out the recipe and are heading into the kitchen to whip this up!

**Update (8/22/2013) - I have made this several times and it turns out perfect every time.  I have also made this into mini muffins.  You will get 48 mini muffins - bake for 10-11 minutes.** 
Pumpkin Chocolate Chip Bread 
with Chocolate Drizzle
1 1/2 c. all-purpose flour
1 1/2 tsp. baking soda
1 tsp. salt
2 tsp. cinnamon
1/2 tsp. nutmeg
1 c. canned pumpkin puree
1 c. brown sugar
1/2 c. low-fat buttermilk
1 egg
1 Tbl. canola oil
1/2 c. chocolate chips 

Chocolate Drizzle
1/4 c. chocolate chips 

Preheat oven to 350 degrees.  Spray a loaf pan with non-stick cooking spray.  In a small bowl, mix flour, baking soda, salt, cinnamon and nutmeg; set aside.  In a large bowl, beat pumpkin, brown sugar, buttermilk, egg and oil.  Add dry mixture, stirring just until moistened; do not overmix.  Fold in chocolate chips.   Pour into pan.  Bake for 50-60 minutes or until toothpick comes out clean.  Let cool for 15 minutes.  

For chocolate drizzle: Add chocolate chips to a small bowl.  Microwave 30-45 seconds until chocolate is melted.  Drizzle over warm bread. (My bread was completely cool when I added the drizzle and I used a fork to drizzle the chocolate)  

Jenn's Notes: This bread browns pretty quickly in the oven thanks to all that brown sugar.  It will look very dark like you burnt it, but it doesn't taste burnt.  You could always tent a little foil over it the last 10 minutes of baking if you don't want it as dark.  Mine was done at 50 minutes.       

Thursday, September 27, 2012

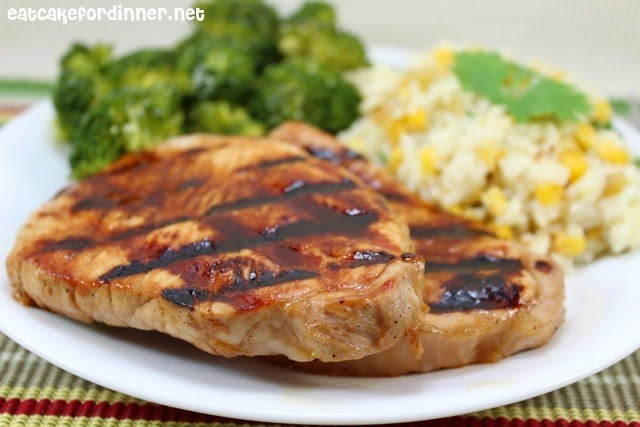
Sweet Dijon Pork Chops

Oops . . . I did it again . . . I bought ANOTHER cookbook.  This one is a real winner! 

It started when I came home with a new set of stainless steel measuring spoons.  Everyone needs a set of stainless steel measuring spoons.  My mom gave me her Kohl's cash, because she wasn't going to make it over there before it expired.  So, I didn't actually have to pay anything for these spoons.  

The problem is, that I kind of have a little obsession with measuring cups and spoons.  So, "The Mr." opened my drawer and said okay then, you need to get rid of one of these sets you already have, because you don't have anymore room.  Then he said, anytime you come home with something new, you have to get rid of something you already have. 

In my mind, I heard It's okay honey, go ahead and go shopping all you want, but you might want to give away something in return.  So, I got rid of a cookbook I have never used and I went and bought a new one! 

I found a new blog back when I was searching for a Copycat Cafe Rio Tortilla Soup recipe and I have been a fan ever since.  When I saw they were coming out with a cookbook, I had to pick up a copy.  One of the sisters lives in Utah and I have to support my fellow Utahns.

I am loving this new book, lots of yummy things I want to try.  I love that the majority of the recipes are from scratch, yet still really easy to make.  I found these pork chops in that new book and adapted them to my taste.  They turned out WAY GOOD.  The flavor was incredible and I know I will make this recipe a lot.

Sweet Dijon Pork Chops
4 pork chops
Marinade:
1 large lemon, juiced
1/4 c. light brown sugar
2 Tbl. Dijon mustard
1 Tbl. soy sauce
a few dashes Worcestershire sauce
1 Tbl. vegetable oil
1 clove garlic, minced
3 Tbl. water
salt and pepper, to taste

Place pork chops in a large plastic zip-top bag.  Combine all marinade ingredients and pour over the pork.  Squeeze bag to release excess air before sealing.  Marinate the pork in the fridge at least two hours (the longer the better), flipping the bag over partway through.  Grill pork over medium heat until internal temperature registers 160 degrees on an instant-read thermometer.

Jenn's Notes:  I marinated my pork chops for around four hours and they tasted amazing.  I grilled them on the George Foreman.  If you would like, you could set aside a small amount of the marinade before adding the pork and drizzle it over the pork chops before serving.  

Tuesday, September 25, 2012

Curly Noodle Skillet Dish

This dish is fast, super easy and very budget friendly.

I picked up a giant box of beef-flavored ramen noodles during a case lot sale last year or so.  

I was like . . . oh my gosh . . . 50 packages of Top Ramen for $1 . . . what a deal.

Then I got home and I was like . . . oh my gosh . . . what am I going to do with 50 packages of Top Ramen?

(okay, it was really more like 12 packages, I may have exagerated a little)

A year later and I still have that big box of ramen noodles in my pantry.  Time to start using them up. 
This dish turned out pretty good.  I wouldn't say it's the best meal out there, but for as fast and easy as it was, I will make it occasionally and I think kids would really like it.
Curly Noodle Skillet Dish
1/2 Lb. ground beef
1/2 an onion, finely chopped
1 (14.5 oz.) can diced tomatoes, undrained
1 c. water
2 pkgs. beef-flavored ramen noodles, crushed
1 can beans (pinto, black, kidney), drained and rinsed
1/2 - 1 tsp. chili powder, to taste, opt.

Brown ground beef in a large skillet over medium heat; season with salt and pepper.  Add the onions and saute another few minutes.  Add the can of tomatoes, water, crushed ramen noodles, both seasoning packets from the noodles, beans and chili powder.  Bring to a boil and cook for 5 minutes or until the noodles are tender.  Serves 4-5.  

Jenn's Notes: The chili powder is not in the original recipe, but I felt like it needed a little kick.  I think this dish would be great with some Cheddar cheese on top.    

Sunday, September 23, 2012

Double Decker Beef Tacos

Every once in a while, I see commercials advertising a taco that is a crunchy shell and a soft flour shell stuck together with cheese.  I have always wanted to try one and when I finally got around to it, the place didn't have them anymore (or maybe I was at the wrong place?).  It must be a limited edition menu item or something that they bring back occasionally?  I was recently reminded of those tacos and figured I would try and make my own. 

I used my favorite ground beef taco recipe for the filling.  I'm not sure if the kind you buy are sandwiched together with just cheese or if it is a cheese sauce?  I opted to go the lazy route and use regular shredded cheese.  I thought these turned out yummy, but next time I do want to try a cheese sauce.  I like the idea of having the cheesy sauce ooze out when I take a big bite.  I have also seen some sandwiched together with refried beans, so that would be great too.  I served these with a side of this easiest Mexican Rice using green salsa instead of regular salsa.
Double Decker Beef Tacos
From: Jenn@eatcakefordinner
(Printable Recipe) or (Printable with Picture)

1 batch of your favorite taco meat
crunchy corn taco shells
small flour tortillas
shredded Cheddar cheese
chopped lettuce
diced tomato
salsa
chopped cilantro
any other desired toppings

Cut flour tortillas, using a pizza cutter, to fit around the corn shells.  Top entire surface of flour shell with shredded cheese and place in the microwave for 5-10 seconds or until cheese is melted.  Immediately fold the flour shell around the corn shell, pressing together to seal.  Fill corn shell with taco meat and top with desired toppings.  Repeat with remaining shells.  Serve.    

My Favorite Taco Meat
1/2 Lb. ground beef
1/4 c. onion, finely chopped
1 (8 oz.) can tomato sauce
2 Tbl. fresh cilantro, minced
1/2 Tbl. ground cumin
1/2 tsp. garlic powder
1/2 tsp. chipotle chili powder
juice of 1/2 a lime
salt and pepper

Brown ground beef in a large skillet; add onion and saute a few minutes or until tender.  Add tomato sauce, cilantro, cumin, garlic powder, chili powder and fresh lime juice.  Season with salt and pepper, to taste.  Simmer for 5 minutes.  If mixture starts to look too dry, add 1 or 2 Tablespoons of water and stir to combine.  Yield 5 tacos

Friday, September 21, 2012

Vanilla Chai Cupcakes with Chai Spiced Buttercream

Isn't it amazing how a certain smell can instantly take you back to a specific moment in time?  

When I smelled this cupcake batter, I was instantly taken back to Seattle.  I have only been there once and it was back in 2009.  Jake and I drove up there (from Utah) to see our favorite band perform two, back-to-back, nights.  We had the funnest time EVER!

Something I noticed was everyone we talked to (the locals) had at least two jobs.  Our hotel receptionist also worked as a waitress.  Our shuttle driver at the hotel we stayed at was also the bellhop at the hotel where we had to park our car.  Yes, there is such limited parking space that we had to park our car at another hotel around the block and we had to pay for it to stay there every night, definitely different from the other places I have been.  There were several others we met that also had multiple jobs.  You guys are hard workers!  

I loved the environment and I loved walking around everywhere.  We were really lucky, because it did not rain at all the whole time we were there (other than a few minutes during the drive into town).  We visited the famous Pike Place Market where we had to stop and watch the fishmongers "throw the fish" and I was even talked into eating some fresh, deep fried, halibut and I am NOT a seafood person.  It's amazing what you can be convinced to do while on vacation :)

Of course, I had to check out the world's first Starbucks and swing by Sir La Table where I picked up my very first bottle of Vanilla Bean Paste and a whole bunch of cute cupcake wrappers.  I even made a 10-15 minute trek, uphill, to Trader Joes (Queen Ann).  I had heard so much about that place and my trip wouldn't have been complete if I didn't get to check it out.  We also hit up several other tourist spots and had the time of our lives.
 Not only did these cupcakes give me a walk down memory lane, but I thought they tasted great.  The majority of the flavor is from the Cardamom.  Cardamom has got to be one of the most interesting spices I have EVER come across in my life.  Both the smell and flavor are so unique and I don't know of any other spice you could use as a substitute.  You might love the flavor or you might think it is really strange.  If you pick it up at your local grocery store, the bottle will most likely be over $10.  I was able to find a big bottle of it at World Market for only $4.  
Vanilla Chai Cupcakes
3 sticks unsalted butter, room temperature
2 c. sugar
5 large eggs, room temperature
1 1/2 tsp. vanilla extract
3 c. all-purpose flour
1 tsp. baking powder
1/2 tsp. baking soda
1/2 tsp. kosher salt
1 c. buttermilk

Chai Spice Mix
3 tsp. ground cardamom
3 tsp. ground cinnamon
1 tsp. ground ginger
1/2 tsp. (scant) ground cloves
1/2 tsp. ground nutmeg

Combine the chai spice mix ingredients.  Reserve half for the cupcakes and half for the frosting; set aside.  Preheat oven to 325 degrees.  Line muffin tins with paper liners and lightly spray with cooking spray.  In a large bowl, cream the butter and sugar until very light and fluffy.  Add the eggs, one at a time, beating after each addition.  Scrape down the bowl.  Add the vanilla extract and mix well.  In a separate bowl, combine the flour, baking powder, baking soda, salt and half of the chai spice mix.  In 3 parts, alternately add the dry ingredients and buttermilk to the batter, beginning and ending with dry.  Mix until just combined.  Fill muffin liners 2/3 full.  For regular cupcakes: bake 24-25 minutes, yields around 30-32 cupcakes.  For mini cupcakes (recommended): bake 10-11 minutes, using 1 Tablespoon of batter per cupcake will yield around 100 - 104 mini cupcakes.  Cool completely and frost with Chai Spiced Buttercream.  Store in an air-tight container at room temperature.   


cupcake recipe adapted from: Ina Garten and chai spice mix adapted from: Some More Please

Chai Spiced Buttercream
from: Jenn@eatcakefordinner
4 sticks unsalted butter, room temperature
pinch of salt
2-3 tsp. vanilla extract
1/2 batch chai spice mix
5 c. powdered sugar
milk, only if needed

Beat butter, salt and vanilla until light and fluffy.  Add the chai spice mix and mix until combined.  Add the powdered sugar, one cup at a time, beating after each addition.  Add milk, only if needed to reach desired consistency.  Beat for a minute or two or until light and fluffy.  

Jenn's Notes: I recommend making the mini cupcakes, because the unique flavor of these might be a little much in a regular size cupcake.  If you don't want 100 mini cupcakes, the recipe can easily be cut in half.  If you have a favorite buttercream recipe, feel free to use that and add the chai spice mix.  The recipe I provided will make enough to pipe a big swirl on each cupcake.  If you want less frosting, make sure to cut the recipe back.  These will stay fresh for several days.     

Tuesday, September 18, 2012

Cinnamon Swirl Pumpkin Bread with Cinnamon Glaze

I was checking my emails as usual, when I saw one from Sally's Baking Addiction.  It was a new post for Cinnamon Swirl Banana Bread.  I was reading through the post when I came across this sentence, 

"Today's bread is unreal.  It's like biting into a huge cinnamon bun but better"

Say what?

Next thing I knew, I was pulling this bread out of the oven.  

I used pumpkin instead of banana.  I would have never thought to do that if it wasn't for one of my lovely readers who told me she made my Favorite Pumpkin Cake recipe, but used bananas instead of pumpkin and she said her husband declared it the best he has ever had.   

So, if that worked for her, why couldn't I do the opposite and use pumpkin instead of bananas?
It turned out FABULOUS.  This bread is delicious and the good news is that it gets better and better as the days go bye.  I wouldn't go as far as to say it is better than biting into a cinnamon bun, but that is just my opinion as I happen to be a HUGE cinnamon bun lover.  I would definitely make it again and it was a nice change from my usual pumpkin chocolate chip bread.  FYI - The glaze does eventually soak into the bread.    
Cinnamon Swirl Pumpkin Bread
2 c. wheat flour (I did 1 cup white 1 cup wheat)
3/4 tsp. baking soda
1/2 tsp. salt
1 tsp. ground cinnamon
1/2 c. light brown sugar
4 Tbl. (1/2 stick) unsalted butter, softened
2 large eggs
1 1/2 c. canned pumpkin puree
1/3 c. Greek yogurt (I used sour cream)
1 tsp. vanilla extract

Cinnamon Swirl
1/4 c. sugar
1 tsp. cinnamon

Simple Glaze
1/2 c. powdered sugar
1/2 - 1 Tbl. milk
1/2 tsp. cinnamon, opt.

Preheat oven to 350 degrees.  Combine flour, baking soda, salt and cinnamon; set aside.  In a separate bowl combine brown sugar and butter and beat until fluffy.  Add eggs, one at a time, beating after each.  Add the pumpkin puree, yogurt and vanilla and mix until well blended.  Add the dry ingredients and mix until just combined.  Do not overmix.  Batter will be very thick.  Spoon half the batter into a greased 9x5 inch loaf pan.  Sprinkle with the cinnamon and sugar.  Top with remaining batter and carefully spread out evenly.  Bake for 50-55 minutes or until a toothpick comes out clean.  Cool in pan 15 minutes.  Remove from pan and cool completely on wire rack.  While the bread is cooling, make the glaze.  In a small bowl, stir together the powdered sugar, 1/2 Tablespoon milk and cinnamon.  Add more milk if needed to reach desired thickness.  Drizzle over cooled pumpkin bread.    

Jenn's Notes: I am a huge fan of using non-fat yogurt in place of sour cream in baked goods.  Since, I had to make this recipe as soon as I saw it, I ended up using sour cream as that was all I had, but I know it would be great with the yogurt too. 

Sunday, September 16, 2012

Copycat Cafe Rio Tortilla Soup

If you live by a Cafe Rio, then you will already know what I am talking about.  If you do not live by a Cafe Rio (I am so sorry), I am telling you, it is my all-time favorite Mexican food place EVER.  I can eat it, eat it and eat it some more!  One of the things I had never tried was their tortilla soup.  I was told so many times how good it is, but in my mind, I am thinking a brothy soup vs. a tostada?  Huh?  Tough choice - NOT - I am getting a tostada.  A brothy soup just didn't sound appealing to me.  
  
I finally decided to get the soup one afternoon.  OMG! Let's just say, I am OBSESSED now.  Why did I ever doubt that I wouldn't absolutely love this soup?  It is not JUST a brothy soup.  It is loaded with hearty ingredients and packed with an amazing flavor.  It leaves you feeling full and satisfied and thinking about the next time you are going to eat it.  It is so good that it doesn't matter if it's the middle of July and 100 degrees outside, you WILL still want this soup.

Of course, I had to search for a copycat recipe.  I found quite a few, but this one sounded most promising.  There are a lot of steps involved.  None of them are hard, but it will take some time.

It turned out great.  There are a few differences, but overall I thought it was a pretty good copycat recipe.  The broth was not quite as flavorful as Cafe Rio's and next time I will up the spices.  Also, Cafe Rio's seemed to have more corn flavor.  Some of the copycat recipes I found said to add torn up corn tortillas to the broth and cook it long enough so they disintegrate.  Maybe that is something to try next time?

Here is how you serve the soup exactly like Cafe Rio:

1.  Put chicken in your bowl
2.  Top with Pico
3.  Top with a scoop of Guacamole
5.  Add shredded cheese (I'm not sure what kind of cheese Cafe Rio uses, but this recipe called for Pepper Jack)
6.  Add the flavorful broth
7.  Garnish with crunchy corn strips, cilantro and lime wedges.  DO NOT skip the crunchy corn chips on top.  They soak into the broth and when they soften, they are almost like noodles.  Oh my gosh - so good.  If you don't want to deal with making your own tortilla strips, you could always try using store-bought, corn flavored, tortilla chips.  Just make sure to add some kind of crunchy corn flavored goodness.  Serve with a flour tortilla on the side for dipping.     
Copycat Cafe Rio Tortilla Soup
slightly adapted from: Favorite Family Recipes

1 c. onion, finely chopped
1/2 c. carrots, finely chopped
1 tsp. cumin
dash of cayenne
1 tsp. chili powder
5 cups low-sodium chicken broth
3 Tbl. fresh cilantro, finely chopped
juice of 1/2 lime
pepper, to taste
Pepper Jack cheese, shredded
cilantro, for garnish
lime wedges, for garnish
shredded chicken, recipe below
pico de gallo, recipe below
guacamole, recipe below
tortilla strips, recipe below
warmed flour tortillas, for serving

Make sure you already have your chicken cooking.  In a small skillet, saute onion and carrots in 1 Tablespoon oil until slightly tender.  Stir in cumin, cayenne and chili powder and saute an additional minute or two.  Transfer seasoned vegetables to a small-medium crockpot (or medium-sized saucepan).  Add chicken broth, cilantro, lime juice and pepper. Cook on low (or simmer on stove) for at least 2-3 hours.  

To serve: In individual bowls, layer chicken, pico, a scoop of guacamole and shredded cheese.  Ladle about 1 - 1 1/2 cups of broth directly over layers.  Garnish with crunchy tortilla strips, cilantro and lime wedges.  Serve with warmed flour tortillas for dipping.  Serves: 4-5   


Copycat Cafe Rio Shredded Chicken
slightly adapted from: Cooking Classy
1 1/2 Lbs. chicken breasts
1/4 c. + 1/8 c. low-sodium chicken broth
1/2 c. Italian salad dressing
1/2 Tbl. chili powder
1 tsp. onion powder
1/2 tsp. garlic powder
1/2 tsp. paprika
1/2 tsp. cumin

Place chicken breasts in crockpot.  Combine remaining ingredients and pour over chicken.  Cover and cook on low until chicken is done, about 4-6 hours.  Shred chicken in whatever sauce is remaining.  (You could always cook this in the oven if you need it to be done sooner).      

Pico de gallo (or use your favorite recipe)
tomatoes, diced
onion, finely chopped
cilantro, finely chopped

I chopped up a few tomatoes, added slightly less onion and some cilantro.  I figured the measurements didn't matter that much, since you will be adding it to the soup and it will mix with all the other ingredients. 

Guacamole (or use your favorite recipe)
1 ripe avocado
a few Tbl. of the pico de gallo
salt and pepper

Mash up avocado and stir in a few Tablespoons of the pico de gallo.  Season with a little salt and pepper.

Crunchy Tortilla Strips
**If you don't want to deal with frying tortilla strips, you could try using store-bought corn tortilla chips and crush those up in the soup.  I like the crunchy strips, because they soften and end up tasting like noodles, but using store-bought chips would save a lot of time and effort.  

1 pkg. soft corn tortillas, 
    cut into small strips using a pizza cutter
vegetable or canola oil

Add enough oil to a medium-sized saucepan to go about 2-3 inches up the side of the pan.  Heat over medium-high heat.  Carefully add some of the tortilla strips to the hot oil and fry until crisp, this will only take a few minutes per batch.  Using tongs, carefully remove to a paper-towel lined plate and season with salt.  Repeat with remaining strips.  Make sure you fry the strips in a few different batches, so they will cook right.   

Jenn's Notes: Make sure to taste the broth before serving and adjust the seasonings to your desired taste. 

Friday, September 14, 2012

Soft Pumpkin Cookies with Chocolate Frosting

I had this "genius" idea for some cookies.  I was so proud of myself for coming up with it.  Have you guys seen those cookies where the base is a chocolate cookie, then it is topped with marshmallow creme and then chocolate frosting?  Well, I had this idea to make a pumpkin cookie and top that with marshmallow creme and chocolate frosting.   I have only ever seen pumpkin cookies frosted with cream cheese frosting and I don't know why I have never seen any frosted with chocolate frosting, since chocolate and pumpkin are a PERFECT pair (like pumpkin chocolate chip cookies) and marshmallows taste great with anything, so I figured these cookies would have to be AMAZING.  

I grabbed out my jar of marshmallow creme only to see that the "Best By" date was the month prior.  Only a month?  It still should be good.  I had already made my cookies and my frosting, so, I guess I really didn't have a choice.  I began spreading the marshmallow creme over the cookies, but after I finished the first dozen, I realized that it was running down the sides of the cookies.  Isn't marshmallow creme usually super sticky and stays in place?  Oh well, no big deal, I guess?  I will just wait until it finishes spreading and then I will add the chocolate frosting.  
I finished adding the creme to two dozen of the cookies and I left one dozen plain.  I woke up the next morning to add the chocolate frosting only to find that my pan had more marshmallow creme on it that the cookies did.  It completely ran down every last bit of the cookies.  I added frosting to one and it tasted great, but they were a super sticky mess.  So, my "genius" idea was squashed.  What do you think, should I try again? 

Luckily, I still had that extra dozen cookies that I left plain and I frosted those with my chocolate frosting and they TASTE GREAT. 

I made my pumpkin cookies less sweet than usual, since marshmallow creme is super sweet and so is the chocolate frosting.  I also only added a small amount of spice, because I didn't want that flavor to overpower the chocolate flavor.  I used my favorite chocolate frosting recipe, but I think these cookies would be outstanding with this fudgy chocolate frosting!
Pumpkin Cookies
1/2 c. shortening
1 1/4 c. light brown sugar, lightly packed
2 eggs
1 1/2 c. canned pumpkin puree
1 tsp. vanilla extract
2 1/2 c. all-purpose flour
4 tsp. baking powder
1/2 tsp. salt
1/2 tsp. cinnamon
1/4 tsp. ground nutmeg

Cream together shortening and brown sugar until very light and fluffy.  Add the eggs, one at a time, beating after each.  Add the canned pumpkin and vanilla (mixture may look curdled).  In a separate bowl, combine the flour, baking powder, salt, cinnamon and nutmeg.  Add dry ingredients to wet ingredients and mix together until just combined.  Drop around 2 Tablespoons or so of dough per cookie onto cookie sheet.  Bake at 350 degrees for 14-16 minutes.  Do not overbake or they might be dry.  Yield: around 3 1/2 dozen cookies.    

Chocolate Frosting
From: Jenn@eatcakefordinner
12 Tbl. (1 1/2 sticks) unsalted butter, softened
2-3 Tbl. cocoa powder
pinch of salt
2-3 tsp. vanilla extract
3 1/2 c. powdered sugar
a few Tbl. of milk, if needed

Beat the butter until fluffy.  Add the cocoa powder, salt and vanilla and beat to combine.  Add the powdered sugar, one cup at a time, beating after each addition.  Add a little bit of milk if needed.  Beat until light and fluffy.  Spread over cooled cookies.  

Jenn's Notes: Since I added less sugar and less spice, these cookies aren't the best on their own.  They really need the frosting on top to make them taste yummy.  Make sure you do not overbake them, or they will be slightly dry.  I thought they were best when eaten within a day or two.  Or, if you have a favorite pumpkin cookie recipe, you could always use that instead.    

Wednesday, September 12, 2012

Cookies and Cream Popcorn

When I saw this recipe I immediately knew that I wanted to make it for my friend Sue's birthday.  She loves white chocolate, she loves OREOS and she loves popcorn. I figured this would have to be a hit.    

The original recipe only called for 9 cups of popped popcorn.  After adding the 9 cups to my bowl, I knew there was no way that would feed all of my co-workers and if I added an entire package of melted white chocolate, the popcorn would be way over loaded.  I kept adding popcorn until it looked  good and 15 cups ended up being perfect.  Each and every kernel was coated with white chocolate.  The 20 crushed OREOS ended up looking perfect.

 After all was said and done and we tasted it, I thought it mostly tasted like white chocolate with a little hint of OREO flavor here and there.  I love white chocolate, so I thought it was great.  I sent some home with my friend and she said her son LOVED it and asked if I would make it again for them!  
Cookies and Cream Popcorn
slightly adapted from: Chef-In-Training
(Printable Recipe) or (Printable with Picture)

15 cups popped popcorn
20 OREOS, crushed (or more if you want)
1 (24 oz.) package white almond bark

Add 15 cups of popped popcorn to a very large bowl, making sure to not get any un-popped kernels in the bowl.  Place Oreos in a large zip-lock bag.  Using a rolling pin, lightly hit Oreos until crushed.  Add crushed Oreos to the bowl of popped popcorn and toss a little bit to distribute evenly.  Chop the almond bark and place in a large, microwave safe bowl.  Microwave until melted, stopping to stir every 30 seconds so the chocolate doesn't burn.  Mine only took 1 minute to 1 minute 30 seconds to be fully melted.  Pour over popcorn and Oreos and fold into popcorn until every last kernel is coated.   

Jenn's Notes: If you are using the kernels and popping them in your popcorn popper (rather than using microwave popcorn), I did three different (1/4 cup) batches of kernels and ended up with 15 cups of popcorn.  

Sunday, September 9, 2012

Pioneer Woman's Good Morning Muffins

When I saw Pioneer Woman making these muffins on T.V., I was immediately drawn to the recipe.  I LOVE all things orange and I LOVE muffins.  Especially muffins with a crunchy topping.  

They had mixed reviews on Food Network.  Most of which said they weren't sweet enough and they didn't have any orange flavor.  So, I added extra sugar and I added Orange Bakery Emulsion!  Problem solved.

They turned out light and fluffy with a light orange flavor.  I made half with the wheat germ on top and half without, just incase we didn't like it and honestly, I couldn't even tell it was on there (flavorwise), but I am glad I added it, because it made me feel like I was eating something healthy.  These tasted best the day they were made, but still tasted good the 2nd day.  I would try and finish them off before the 3rd day.
Good Morning Muffins 
4 c. all-purpose flour
3/4 c. sugar
2 Tbl. baking powder
4 Tbl. unsalted butter, cold
1/4 c. shortening
1 1/2 - 2 c. sweet orange marmalade
1 c. orange juice
2 tsp. vanilla extract
1 - 1 1/2 tsp. orange bakery emulsion (or orange extract)
3 eggs

Topping
1/2 c. sugar
1/4 c. brown sugar
1 tsp. cinnamon
1 tsp. nutmeg
1/2 tsp. salt
2 Tbl. melted butter
wheat germ, for sprinkling

Preheat oven to 375 degrees.  Line a standard-size muffin tin with paper liners and lightly spray with cooking spray.  Combine the flour, sugar and baking powder.  Add the butter and shortening and cut into dry ingredients.  In a separate bowl, combine the orange marmalade, orange juice, vanilla, orange extract and eggs; whisk very well.  Add wet ingredients to dry and stir gently just until combined. Try to use no more than 10 large strokes, batter will be lumpy.  Fill lined muffin tins 2/3 full with batter.  Make the topping:  combine sugar, brown sugar, cinnamon, nutmeg and salt.  Add melted butter and stir until well combined.  Top batter with a heaping 1 teaspoon of mixture.  Sprinkle a 1/2 teaspoon of wheat germ over each as well.  Bake for 17-18 minutes or until a toothpick comes out clean. 

Jenn's Notes: I was so glad that I decided to add orange bakery emulsion, because even with it, they came out with only a light orange flavor.  I loved the slightly crunchy topping and recommend adding the wheat germ if you have it.  If not, I don't think I would buy a jar of it just for these.  I cut the recipe in half and ended up with 15 muffins.  I did add 2 eggs to half the batch, because my eggs seemed really small and I used just under 1 cup of orange marmalade.  Mine were perfect at 18 minutes and they turned out light and fluffy and I would make them again.           

Saturday, September 8, 2012

Cheesy Zucchini Stuffed Chicken

I know you guys are probably zucchinied-out this year and are ready to move onto other things (like pumpkin and there will be plenty of pumpkin recipes to come), but this chicken was really good and I had to share it with you. 

It is stuffed with cheesy goodness. You can't even tell there is zucchini in it. I decided to peel my zucchini and I made sure to squeeze out the excess water to ensure the filling wouldn't be watery and with a touch of Italian seasoning it was yummy.

I decided cutting chicken breasts into cutlets is the way to go vs. pounding out the chicken.  Whenever I pound out chicken, I move everything on the counter to another counter and even though I cover the chicken with wax paper while I pound it, I imagine chicken juice splattering everywhere and I end up bleaching the entire kitchen when I am done - walls and everything!  I am kind of a clean freak like that.  Slicing a chicken breast in half is a much easier solution.  This recipe might look long, but it is really easy to throw together.  
Cheesy Zucchini Stuffed Chicken
From: Jenn@eatcakefordinner
(Printable Recipe) or (Printable with Picture)

1 tsp. olive oil
2 cloves garlic, minced
1 1/2 c. zucchini, grated and squeezed dry
  (measure it before you squeeze out the excess liquid)
1/4 c. + 2 Tbl. Parmesan cheese, grated
3/4 c. Monterey cheese, shredded
salt and pepper
Italian seasoning
4 chicken cutlets
  (2 large chicken breasts sliced in half horizontally)
1 egg, beaten
1 pkg. Low-Fat Ritz crackers, crushed
   or you can use any kind of bread crumbs
cooking spray

Heat 1 teaspoon olive oil in a medium skillet over medium heat.  Add the garlic and cook about 30 seconds, stirring constantly.  Add the grated zucchini and saute about two or three more minutes, stirring occasionally, so the garlic doesn't burn.  Add 1/4 cup of grated Parmesan along with 1/4 - 1/2 teaspoon of Italian seasoning, to taste.  Remove from heat and stir in the shredded Monterey cheese; set aside to cool slightly while you slice the chicken into cutlets.  Season each cutlet with a little salt (remember the crackers have salt on them), pepper and a little Italian seasoning.  Add beaten egg to a bowl and add the crushed crackers and remaining 2 Tablespoons of Parmesan cheese to another bowl.  Divide the zucchini filling evenly between the four cutlets.  Spread out evenly.  

Loosely roll up chicken and dip in beaten egg, then press cracker crumbs into chicken, including the ends.  (Pressing crumbs into the ends will help keep the filling from oozing out while it bakes).  When chicken is completely coated, place seam-side down in a small, lightly greased, casserole dish.  Repeat with remaining cutlets.  When finished, lightly spray tops with cooking spray.  Bake 25-30 minutes or until chicken is no longer pink and registers 160 degrees on an instant-read thermometer.  Serves 4 (Served with a side of rice and broccoli, I thought one chicken roll was plenty)

Jenn's Notes: I peeled my zucchini and grated it on the small side of the cheese grater.  You don't have to peel the zucchini if you don't want.  I made sure to squeeze out all that excess liquid so the filling would be nice and creamy rather than watery.  


Idea adapted from: Skinny Taste

Popular Posts

that give mcdonalds coupons and 
breakfast coupons you also can find recipe from