Tuesday, August 30, 2011

Quick 'n Easy Herb Flatbread

Even though salads would never be my first choice for dinner, I have been trying to eat more of them, because I know they are good for you.  I have figured out a few things that are a must to make them tasty. Homemade ranch, some kind of meat, fresh veggies and some kind of delicious bread on the side!  I have made this flatbread a few times.  The first time, I baked it a little too long and it ended up tasting like croutons, because it was so crunchy.  Last time, I made sure to not over bake it and it turned out delicious and it paired perfectly with my salad.  
Quick 'n Easy Herb Flatbread

1 can (13.8 oz.) refrigerated pizza dough
1 Tbl. olive oil
1/2-1 tsp. dried basil leaves
1/2-1 tsp. dried rosemary leaves, crushed
1/2 tsp. finely chopped garlic (I use garlic powder)
1/8 tsp. salt
1 small tomato, diced
1/4 c. shredded Parmesan cheese

Preheat oven to 425 degrees.  Spray cookie sheet with cooking spray.  Unroll dough on cookie sheet.  Starting at center, press out dough to form 12x8 rectangle.  In a small bowl, combine oil, basil, rosemary and garlic.  Brush over dough using a pastry brush; sprinkle with salt.  Place diced tomatoes in shallow bowl.  With the back of a spoon, crush tomato.  Spread tomato over dough.  Bake 5-9 minutes or until edges are light golden brown.  Sprinkle with cheese.  Bake 2-3 minutes longer or until cheese is melted until edges are golden brown. Cut into squares and serve warm.  

Jenn's Notes:  I just press out the dough as much as I can.  I don't measure it to make sure it reaches 12x8.  I also add a little extra cheese.  Make sure not to overbake or it will be crunchy.  

Chef Salad (this is what I added to mine)
chopped lettuce
chopped deli ham
chopped deli smoked turkey
diced tomato
chopped cucumbers
freshly grated Parmesan cheese

Friday, August 26, 2011

Super Easy Guiltless Alfredo Sauce

How easy does something have to be to be considered easy? How about throwing all the ingredients into a blender, pureeing until smooth, then throwing that in a pan with some sauteed garlic and cooking until thick?  Is that easy enough?  Oh yeah!  This is a great weeknight dinner than you can throw together in no time.  You can serve it plain over pasta or add some grilled chicken, bacon and broccoli like I did.  Or use it on this yummy pizza.  It is seriously delicious!  The sauce is thick, creamy and very smooth.
Guiltless Alfredo Sauce
adapted from: Our Best Bites    

2 c. low-fat milk
1/3 c. (3 oz.) low-fat cream cheese
2 Tbl. flour
1 tsp. kosher salt
1 Tbl. butter
2 garlic cloves, minced
1 c. freshly grated Parmesan cheese

In a blender, blend the milk, cream cheese, flour and salt until smooth; set aside.  In a large saucepan, melt butter on medium heat and add the garlic.  Saute the garlic for about 30 seconds, stirring constantly to prevent the garlic from sticking and burning.  Add the milk mixture to the pan.  Stir constantly for 3-4 minutes or until it just comes to a simmer.  Keep stirring and let it cook for a few minutes more or until the sauce thickens, about 6-7 minutes.  Once the sauce has started to thicken, remove from heat and whisk the cheese into the sauce.  Immediately cover the pan.  Allow the sauce to stand for at least 10 minutes before using.  It will continue to thicken upon standing.  Serve immediately as desired.  Refrigerate leftovers for up to 5 days.  The sauce will become very thick, once refrigerated.  To use it, reheat the sauce and add a little milk until the desired consistency is reached.

According to Our Best Bites, this sauce has around 100 calories for 1/4 cup of the sauce!

Jenn's Notes: I marinated some chicken in Italian dressing and grilled it on the George Foreman, then I cut it into strips.  I also cooked some bacon and steamed some fresh broccoli.  I served all of this along with the sauce over some Penne pasta.  The sauce makes a ton.  If you are only serving a few people, you will probably want to cut it in half.  I have never eaten this as leftovers.  The only thing I do different with the sauce recipe is I add a little black pepper.       

Tuesday, August 23, 2011

Best EVER Zucchini Muffins

These muffins are by far, hands down, without a doubt the BEST zucchini bread/muffin recipe I have EVER had!  I have tried many different recipes, but this was the first one that had lemon zest in it! Zucchini and lemon were meant to be together.  The flavor of the lemon zest mixed with the zucchini and the cinnamon is the perfect combination.  I have made these twice in the past week (and I am making another batch tonight) and they already deserve a spot in "My Favorite Breads" section, which is usually only recipes I have made for years, but this one is so good that it deserves to be there!!  Even if you're thinking that you've tried it all when it comes to zucchini, please at least try this recipe.  I am going to try and make it into bread and see what happens?  
Best Ever Zucchini Muffins
adapted from: Stephanie's Kitchen

3 c. all-purpose flour
2 tsp. baking soda
1/2 tsp. salt
2 tsp. cinnamon
1/2 tsp. nutmeg
1 1/3 c. sugar
2 eggs
2/3 c. butter, melted (plus 1 Tbl. for later)
2 tsp. vanilla
zest from 1-2 lemons
3 c. grated un-peeled zucchini

Whisk together, flour, baking soda, salt, cinnamon and nutmeg; set aside.  In a separate bowl, beat together sugar and eggs until creamy.  Add the 2/3 cup melted butter, vanilla and lemon zest and mix well.  Add the shredded zucchini and mix to combine.  Last, add the dry ingredients and mix just until blended.  Batter will be very thick.  Melt one Tablespoon butter and using a pastry brush, brush all over the muffin cups.  Do this instead of using cooking spray.  Distribute batter evenly between greased muffin cups, filling completely full. Bake at 350 degrees for 21-23 minutes for regular muffins or 30-32 minutes for jumbo muffins.  Muffins will be browned and a toothpick inserted in the center will come out clean.    

Jenn's Notes: I cut this recipe in half both times and the first time I got 7 regular muffins and 1 jumbo muffin.  The 2nd time I made all jumbo and ended up with 4 muffins.  I filled the batter up to the top of the cup and they baked up beautifully.  So, I have no idea what size tins the original recipe was using to only end up with 12 muffins for a whole batch?  I zested an entire small lemon into my half batch and loved the lemon flavor.  I kept these stored in an air-tight container and they still tasted good on the 4th day!!      

Sunday, August 21, 2011

Homemade Snickers Bars

I was going to post a main dish for you today, but these are so stinkin good, I decided to share them with you instead.  I found this recipe the other day, along with a recipe for homemade Twix and homemade Butterfinger's, but the Snickers recipe was the first one I wanted to try (the rest will come shortly), since they are my favorite candy bar!  

Honestly, when I found this recipe, I was already convinced that they would not taste like a real Snickers, because of the butterscotch chips and the peanut butter and I had already planned on calling these "Almost Snickers" or "Snickers Type Candy Bars", but last night after they were set up, I cut a little piece, took a bite and said "OMG - these really do taste like a Snickers."  Yes, I was a little surprised.  I always knew they would be delicious, but I had no idea they would really taste so close to the real deal.  


These are DELICIOUS!  Creamy chocolate, with chewy nougat, chewy caramel and a slight saltiness with a crunch from the peanuts.  
Homemade Snickers Bars
1st layer:
1 c. milk chocolate chips
1/4 c. butterscotch chips
1/4 c. creamy peanut butter

Melt together all ingredients in the microwave, stirring every 30 seconds until melted.  Spread into a lightly greased 9x13 inch glass pan.  Put in fridge to cool.

Filling:
1/4 c. butter
1 c. sugar
1/4 c. evaporated milk
1 1/2 c. marshmallow cream
1/4 c. creamy peanut butter
1 tsp. vanilla
1 1/2 c. salted peanuts, chopped

Melt butter in saucepan over medium heat, add sugar and milk, stirring constantly to dissolve the sugar.  Bring to a boil and stir for 5 minutes (I only did 3 min.).  Mixture will start to follow your spoon. Remove from stove and stir in marshmallow cream, peanut butter and vanilla.  Mix until smooth.  Spread over first layer and sprinkle peanuts over top.

Caramel Layer:
1 (14 oz.) bag Kraft caramels
1/4 c. whipping cream (I used evaporated milk)

Unwrap and melt the caramels with the cream in the microwave, stirring every 30 seconds until melted. Carefully spread over filling layer.  

Top Layer:
1 c. milk chocolate chips
1/4 c. butterscotch chips
1/4 c. peanut butter

Melt together in microwave, stirring every 30 seconds until melted.  Spread evenly over caramel layer.  Store in the refrigerator until cooled and hardened.  Cut into small bars. Keep refrigerated.    

Jenn's Notes: This is very easy to make, it just takes a little time to prepare each layer.  I cut this in half and layered it in an 8x6 inch glass dish.  I had to make the nougat/filling recipe twice, because the first time I cooked it the entire 5 minutes like the recipe suggested, but it ended up being too hard and crumbly.  I tried again, but this time only cooked about 3 minutes and it was perfect.  When it slightly thickens and starts to move around with your spoon while you stir it, I would quit cooking.  Remember, it will be thicker when you add the mallow cream and peanut butter.  I also used evaporated milk instead of the whipping cream in the caramel, because I didn't want to spend money on a carton of cream to only use a small amount and I already had a can of evaporated milk open for the filling.  I added slightly less than the recipe called for, so it would still be as thick.  I like these right out of the fridge.  I think they taste most like a Snickers when they are cold and chewy!  When they get to room temperature, the chocolate gets pretty soft and melts all over your fingers (I don't know if that is a bad thing)?  You will LOVE them!      

Thursday, August 18, 2011

Browned Butter Crinkles with Browned Butter Frosting

These are one of MY NEW FAVORITE COOKIES thanks to that sinful browned butter frosting.  Oh my gosh!! It is so rich and creamy and divine all thanks to one simple little step - browning the butter!  It's not just the taste, but the smell is amazing too!  I had to keep smelling the pan while I waited for the butter to cool! Browning the butter adds an amazing nutty/toffee type flavor that adds so much depth to your frosting all with one little stick of butter.  I took these to work and I got rave reviews and several requests for the recipe!  You know it is good when people actually ask for the recipe!!   
Browned Butter Crinkles 
with Browned Butter Frosting
adapted from: 101 Gourmet Cookies

2 sticks butter, softened
1 c. sugar
3 egg yolks
pinch of salt
1 1/2 tsp. baking soda
1 1/2 tsp. vanilla
2 1/3 c. all-purpose flour

Cream together butter and sugar until light and fluffy.  Add eggs yolks and salt.  Beat until well blended.  Mix in soda and vanilla.  Last, add flour and mix until combined.  Cover bowl with plastic wrap and refrigerate for one hour.  Form into balls and dip tops in sugar.  Place on a lightly greased cookie sheet and flatten cookies using the bottom of a glass.  Bake at 350 degrees for 8-10 minutes or until lightly golden.  Cool completely and top with frosting.

Browned Butter Frosting
1 stick butter
4 c. powdered sugar
1 tsp. vanilla
1/2 c. heavy cream (I used half-and-half)

Heat butter in a small saucepan over medium heat until golden brown specks appear, stirring occasionally.  Butter will get foamy and if you swirl the pan around, the butter will be light brown and you will see brown bits.  It will have an amazing nutty smell to it.  Almost like english toffee.  Remove from heat and cool completely. (I let mine cool slightly, then I put it in the fridge to continue cooling - it might solidify, but that's okay, just use a rubber scraper and scrape every last bit into your mixing bowl).  Add powdered sugar and vanilla to mixing bowl with butter.  Beat until crumbly.  Slowly add cream until frosting reaches desired consistency.  Spread onto cooled cookies.  Keep refrigerated.    

Jenn's Notes: My first batch, I tried a small ice cream scoop for shaping my cookies, but I thought they turned out too big, because they spread out a lot during baking.  I shaped the remaining dough into smaller balls.  I ended up with 36 cookies (with one large batch and two smaller batches).  I liked them best baked for 9 minutes.  The cookie is crispy on the outside, but chewy in the middle.  The cookies are great, but the frosting is really the star!!  It was a good thing I had planned to take these to work or none of the frosting would have made it to the cookies.  These cookies are very rich!  

Wednesday, August 17, 2011

Bread Machine Wheat Bread

This has been my go-to wheat bread recipe for a few years now.  I used to make it every now and again, but recently I have been making it one to two times a week.  I have not purchased store-bought bread for a few months.  I decided I was going to try and make my own bread for awhile.  The store-bought brand that I prefer is around $4 a loaf, so it was adding up pretty quickly.  Although, I have not added up how much it is to make a homemade loaf of bread, but I would imagine it is cheaper.  Except that honey is pretty expensive now-a-days.  Even so, I still think it is cheaper to make my own bread and I am saving myself from all of those preservatives and since it is started in the bread machine it is a piece of cake to make.  
All you do is add the ingredients to your bread machine in the order recommended, turn it on the dough cycle and let the bread machine do all of the work.  Then, after the dough cycle is over, remove from the bread machine and cook it in your oven.  I prefer it that way, because cooking it in the oven creates a much better crust than if you were to cook it in the bread machine.
I love to eat this bread with my mom's homemade strawberry jam!!  Just imagine a warm piece of homemade bread with butter and homemade jam!!   
Bread Machine Wheat Bread

1 c. warm water
1 Tbl. milk
2 Tbl. brown sugar
2 Tbl. vegetable oil
2 Tbl. honey
1 tsp. salt
1 1/2 c. all-purpose flour
1 1/2 c. wheat flour
2 tsp. instant yeast

Place ingredients in your bread machine pan in the order listed above, starting with water and ending with yeast.  (Or add ingredients in the order recommended by your bread machine manufacturer).  Start your bread machine on the dough cycle (mine takes 1 1/2 hours).  Then, remove from bread pan and place in a greased loaf pan, stretching the dough to completely fill the pan.  Let rise while your oven preheats to 350 degrees.  Bake 30-35 minutes.  If the top begins to brown too quickly.  Place a piece of foil lightly on top of the bread for the remaining cooking time.  Yield: 1 loaf. Stays fresh for 3-4 days.  If you don't eat it up within a few days and it starts to get a little dry, don't throw it away, because it will still make great toast!  

Sunday, August 14, 2011

Summer Chicken Wraps

What do you want more than anything during a hot Summer day (besides popsicles and an ice cold beverage). . . . . Something light and refreshing that doesn't require you to turn on your oven.  This is that perfect recipe.  It's healthy, yet fills you up and doesn't leave you filling weighed down.  If you have leftover chicken around, you won't even need to turn on any appliances. 

 I found this idea over at Sweet Little Smoothie a few months ago and have made these at least four times already!!  Since Summer is going to be over soon, I figured I better get this recipe posted.  You can make these with whatever your favorite veggies are or whatever you have in your fridge.  There are so many possibilities with these chicken wraps.  This is my favorite version so far. 
Chicken Wraps
adapted from: Sweet Little Smoothie

4 chicken tenders or leftover chicken
1/2 c. Italian dressing, for marinating
1/2 c. Cheddar cheese, shredded
1 c. shredded lettuce
1/2 cucumber, cut into thin strips
1 medium tomato, finely diced
Italian dressing, for serving
flour tortillas (or wheat, spinach and tomato flavored)

Place chicken tenders in Italian dressing and let marinate for at least 30 minutes.  Cook on the George Foreman or outside on your grill.  Cut into strips.  Layer your tortilla, lettuce, chicken strips, cucumber slices, tomato and top with cheese.  Drizzle with more Italian dressing.  Roll up, cut in half and serve.  Yield: 2 chicken wraps.

*These ingredients are more of a suggestion, so adjust them to your desired taste.  Switch up the dressing, the tortillas, the meat, the veggies (roasted red pepper, onion, mushrooms, zucchini, eggplant, asparagus) and the cheese.  Use however much of each ingredient you desire!! 

Thursday, August 11, 2011

101 Gourmet Cake Bites Review and Key Lime Pie Cake Bites

101 Gourmet Cake Bites
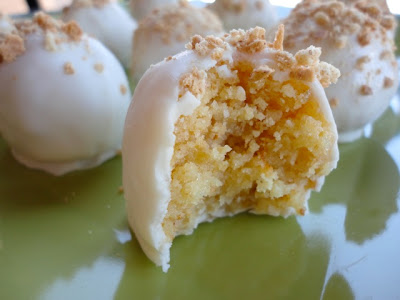
Cake Bites are very popular now a days!!  They are a baked cake that is crumbled and mixed with some type of frosting and flavoring, then rolled into a ball and dipped in chocolate! I have seen them all over blog land, but I had never made them or tried them, until now!!  

I was very generously offered a free copy of Wendy Paul's new book, 101 Gourmet Cake Bites, from Cedar Fort Books to check it out and give my opinion about it.  The book includes all of the cake recipes, which all start with a cake mix along with the yummy frosting recipes.  It was so hard to narrow down all of the amazing gourmet recipes to only one.  I ended up trying the first recipe in the book - Key Lime Pie!!  You guys know that I love key lime pie, so that had to be the first recipe I try.

Now, remember this was my first ever experience with cake bites and I didn't know what to expect.  They were a little more difficult to make perfectly round and smooth than I thought it would be, but I am sure it will be a lot easier the next time around.  The 2nd time is always better.  This is the 3rd day since I made them and I am liking them more and more each day.  They have a great key lime citrus flavor.  I love the snap you get when you bite into the chocolate.
  
There are so many amazing flavors that I can't wait to try, including Coconut Cream Pie, Raspberry Cheesecake, Blackberries and Cream, Orange Creamsicle, Banana Foster, Even More S'more, Candy Cane and the one I am most excited to try - Egg Nog!!!    
  
Key Lime Pie Cake Bites
adapted from: 101 Gourmet Cake Bites

1 box yellow cake mix
1/2 Tbl. grated lime zest
1/3 c. key lime juice
3/4 c. half and half
2 eggs

Mix together cake mix, lime zest, key lime juice, half and half and eggs.  Batter will be thick.  Pour into a greased 9x13 inch baking pan.  Bake at 350 degrees for 28-32 minutes or until cake springs back when lightly touched.  Remove from oven and cool completely.  Crumble cake into small, even pieces, placing crumbs in a large bowl.

Add:
1/4 c. lime buttercream (recipe follows)
1/2 c. sweetened condensed milk
2 Tbl. grated lime zest

With the back of a spoon, mix together cake crumbles with other ingredients until a thick dough consistency forms.  Shape into evenly sized cake bites and cool 1-2 hours in the refrigerator or 20 minutes in the freezer.  Dip into white melting chocolate.  Top with crushed graham crackers, if desired.

Lime Buttercream Frosting (makes about 3 cups)
8 Tbl. (1 stick) butter, softened
3 3/4 c. powdered sugar, sifted
3-4 Tbl. milk or cream
2 tsp. lime extract or lime juice
2 Tbl. lime zest

Place the butter in a large mixing bowl.  Beat until light and fluffy, about 30 seconds.  Stop the mixer and add the powdered sugar, 3 Tablespoons milk, lime extract or juice and lime zest.  Beat frosting, starting at slow and increasing your speed until frosting is nice and creamy.  If frosting is too thick, add a little more milk or cream.

1/4 Recipe Frosting (makes about 3/4 cup)
2 Tbl. butter, softened 
3/4 c. + 3 Tbl. powdered sugar
3/4 Tbl. milk or cream
1/2 tsp. lime extract or lime juice
1/2 Tbl. lime zest

Place the butter in a large mixing bowl.  Beat until light and fluffy, about 30 seconds.  Stop the mixer and add the powdered sugar, 3 Tablespoons milk, lime extract or juice and lime zest.  Beat frosting, starting at slow and increasing your speed until frosting is nice and creamy.  If frosting is too thick, add a little more milk or cream.

Tuesday, August 9, 2011

Chicken and Corn Enchiladas with Homemade Enchilada Sauce

This was my first ever attempt at making homemade red enchilada sauce and it won't be my last!!  I really really liked this sauce.  Sometimes store-bought enchilada sauce can be a little spicy.  Now, I personally like a little spice, but not everyone does, especially kids.  Making your own sauce is a great way to make everyone happy and to control the level of spiciness.  I thought this sauce was pretty mild.  Dried ancho chiles are found in the Mexican section of your grocery store and sometimes in the produce section.  They are very inexpensive.    
Chicken and Corn Enchiladas
adapted from: This Cookbook

Red Enchilada Sauce:
2 dried ancho chili peppers
1 (14 1/2 oz.) can diced tomatoes
1 medium onion, cut into chunks
1 clove garlic, quartered
1/2 tsp. ground cumin
1/2 c. whipping cream

2 1/2 - 3 c. shredded cooked chicken
1 can whole kernel corn, drained
2 tsp. dried oregano
1 c. shredded Monterey Jack cheese
6 medium corn tortillas or flour

For sauce: Soak ancho chili peppers in boiling water until softened, about 15 minutes.  Drain and discard liquid.  Remove the stem and seeds.  In a food processor or blender, combined drained chili peppers, undrained tomatoes, onion, garlic and cumin.  Cover and process or blend until mixture is smooth.  Transfer mixture to a medium saucepan.  Bring to boiling; reduce heat.  Simmer sauce, uncovered, about 10 minutes or until slightly thickened (you should have 1 2/3 cups sauce).  Remove from heat.  Stir in whipping cream;  season to taste with salt and pepper.  Set aside.  

For filling:  In a medium mixing bowl combine the shredded chicken, drained corn, 2 tsp. oregano and 2/3 cup of the sauce.  Heat corn tortillas in microwave, about 10 seconds or until pliable.  Divide filling equally among the tortillas.  Place, seam side down, in a greased 2-quart rectangular baking dish.  Pour remaining sauce over enchiladas.  Cover and bake in a 350 degree oven, about 25 minutes or until heated through.  Uncover and sprinkle the enchiladas with cheese.  Bake, uncovered, for 4-5 minutes more or until cheese is melted.  

Jenn's Notes: I only had one dried ancho chili leftover from this recipe.  So, I only added one, but I added some chipotle chili powder to give it that extra spice and I only added 1/2 an onion.  I also used leftover Bob's Basil Rub Chicken.    

Saturday, August 6, 2011

Chicken Hot Pockets

These chicken hot pockets were very yummy.  What makes them different than every other chicken pie recipe you ask?  Well, the bacon, of course!! The bacon seriously takes these up another notch.  Whatever you do - do not leave out the bacon!!!  I got the recipe from one of my Mom's neighborhood cookbooks.  I had leftover celery, 1/4 stick of cream cheese and some sour cream that needed used up - so this recipe was just what I needed!
Chicken Hot Pockets
adapted from: Whitney M.
(Printable Recipe)

1 tube canned biscuits
1 large chicken breast, cooked and shredded
1/4 stick (2 oz.) cream cheese, softened
2 tsp. dried parsley
2-3 Tbl. celery, chopped finely
1 1/2 tsp. fresh lemon juice
1/4 tsp. garlic, minced (I used garlic powder)
1/2 tsp. lemon pepper
1/4 c. shredded cheese, any kind (I used Cheddar)
4 slices bacon, cooked and crumbled
salt and pepper

1 can cream of chicken soup
1 c. sour cream
a few Tbl. milk

Combine cream cheese, parsley, celery, lemon juice, garlic, lemon pepper, salt and pepper.  Add the shredded chicken, shredded cheese and bacon.  Stir well to combine.  Taste and adjust seasonings as needed.  Flatten each biscuit into a disc and place about 1/4 cup or so of filling into the center of each biscuit (depends on the size of the biscuits you purchased).  Fold edges over and pinch together using a fork.  Continue with remaining biscuits.  Bake at 400 degrees for 13-15 minutes or until golden brown.  Meanwhile, combine cream of chicken soup, sour cream and enough milk to reach a gravy consistency; heat through.  Serve gravy over each pocket. 


Jenn's Notes: I used jumbo butter-flaked biscuits that came with six in a tube and I used thick cut smoked bacon!  Next time I might add a little extra bacon, just because I liked it so much.     

Thursday, August 4, 2011

Pumpkin Cookies with Caramel Icing

Remember my post about Fall?  Well, it didn't help much when I found these cookies on Pinterest the other day.  Man, that website is dangerous.  Every time I get on there, I find several things that look delicious.  So, I couldn't wait any longer, I had to make something with pumpkin!  That something was these cookies.  I hadn't ever had pumpkin cookies with this type of icing before, so I was interested to know what it tasted like.  Let's just say that I was very happy to have extra icing.  It really does taste kinda like caramel and it is soooooooo good!  Think of how good it would be on a chocolate cookie or cupcake?  Yummy.

Pumpkin Cookies with Caramel Icing
adapted from: Let's Dish and All Recipes

1 c. butter, softened
1/2 c. white sugar
1/2 c. light brown sugar
1 c. canned pumpkin
1 egg
1 tsp. vanilla extract
1 tsp. baking soda
1 tsp. baking powder
1 tsp. cinnamon
1/2 tsp. nutmeg
1/2 tsp. salt
2 c. all-purpose flour

Icing:
3 Tbl. butter
1/4 c. milk or heavy cream
1 c. powdered sugar
1 tsp. vanilla
1/2 c. packed light brown sugar

Preheat oven to 350 degrees.  In a large bowl, cream together the butter and sugars.  Add egg and vanilla.  Add pumpkin puree and blend well.  Add baking soda, baking powder, cinnamon, nutmeg, salt and flour.  Mix well.  Drop by heaping tablespoons onto a lightly greased cookie sheet.  Bake for 12-14 minutes.  

To make the icing: in a medium saucepan, combine butter, milk and brown sugar over medium heat.  Cook, stirring occasionally, until mixture just begins to boil.  Remove from heat and stir in the vanilla.  Cool and then stir in the powdered sugar.  Spread over cooled cookies.

Jenn's Notes:  I made a half a batch of these cookies.  I used a small ice cream scoop and got 19 cookies with a half a batch.  The cookies are so soft and pretty delicate.  Let's Dish uses the icing as a frosting, but mine turned out way to runny and was more like a glaze than a frosting.  It might have been because I didn't let it cool enough or because I used milk instead of cream?  I even ended up adding more powdered sugar and it was still pretty runny.  That's okay, because it was still delicious!  Next time, I am going to add less milk and see if it turns out like a frosting.  I can't wait to try it on other desserts!!    

Cookbook Winner Announced


Thanks to everyone who entered my giveaway!!  This has been so much fun and I have loved reading everyones comments!!  I used a random number generator to pick the winner and the winner is . . .

. . . Comment #10 

Brittany said...

My mouth is watering over the Mango-Coconut Sherbet!!!!! 

Congrats Brittany!! You will love this cookbook.  Please email me your mailing address within the next 48 hours!!  eatcakefordinner.blogspot.com


Tuesday, August 2, 2011

Ultimate Quesadilla

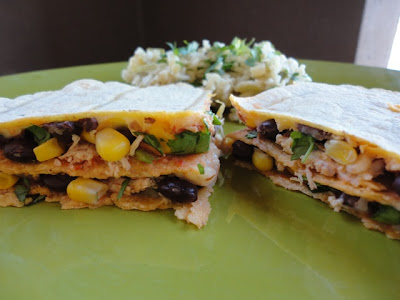
I love quesadillas!!  I have tried so many different variations and you can pretty much throw whatever you want into them, but this was the first time I had tried a layered version!  It turned out delicious and was a lot more filling than your average dinky little quesadilla.
Ultimate Quesadilla
From: Jenn@eatcakefordinner

1 large chicken breast
taco seasoning
salt and pepper
6 medium-sized corn or flour tortillas
1 can corn, drained and warmed
1 can black beans, drained, rinsed and warmed
salsa
cilantro, chopped
1 can diced green chiles
Monterey, Cheddar or Pepperjack Cheese, shredded
sour cream, opt.

Place chicken breast in a small casserole dish.  Season with salt, pepper and taco seasoning.  Bake for about 45 minutes - 1 hour or until no longer pink.  Or you can use leftover chicken.  When done, shred and add more taco seasoning if desired.  Lay tortillas in a single layer on a cookie sheet.  Spray lightly with cooking spray and bake at 425 degrees for a few minutes or until slightly crisp (you don't want them crunchy).  Continue with remaining tortillas.  Take two tortillas and top each with some shredded cheese, shredded chicken, corn, beans, salsa, chopped cilantro, diced green chiles and end with a little more cheese (so the next tortilla will stick).  Top each with another tortilla and repeat layering with ingredients.  Last, top each with a third tortilla.  Place layered quesadilla pies back in the oven for a few minutes until cheese melts or place in the microwave for about 45 seconds.    Cut into triangles and serve with sour cream.  Yield: 2-3 servings.     

Jenn's Notes:  I made one with corn tortillas (my fave) and one with flour tortillas.  I served with a side of my favorite rice and I was only able to eat 2 slices of this quesadilla, because it is so filling.  Make sure to add enough cheese between layers or your corn and beans will fall out as you try to eat it (the cheese helps everything stick together).  This was delicious!   

Popular Posts

that give mcdonalds coupons and 
breakfast coupons you also can find recipe from