Wednesday, June 29, 2011

Aussie Chicken

Bacon, Cheese, Mushrooms . . . How could you go wrong . . . This chicken was DELICIOUS!  It tasted like something you would order at a restaurant.  The chicken was juicy and so flavorful with all of the yummy toppings.  I served this with Cheesy Bacon Stuffed Potatoes and it was seriously the meal of all meals.  If you have any men in your family that complain about eating chicken, serve them this and I think it will change their mind.  It is one hearty chicken dish. 
Aussie Chicken
adapted from: All Recipes  

4 skinless, boneless chicken breasts
2 tsp. seasoned salt
6 slices bacon, cut in half
1/4 c. Mayonnaise
1 Tbl. prepared mustard
1 Tbl. honey
1/2 Tbl. lemon juice
1 Tbl. vegetable oil
1 c. fresh mushrooms, washed and sliced
2 c. Colby-Monterey Jack cheese, shredded
2 Tbl. fresh parsley, chopped, opt.

Rub the chicken breasts with the seasoned salt.  Cover and refrigerate for 30 minutes.  Preheat oven to 350 degrees.  Place bacon in a large deep skillet.  Cook over medium-high heat until crisp.  Set aside.  Add the sliced mushrooms and saute a minute or two.  Remove from pan and set aside.  In a medium bowl, combine the Mayonnaise, mustard, honey and lemon juice.  Heat oil (or use bacon grease) in a large skillet over medium heat.  Place the breasts in the skillet and saute for 3-5 minutes per side or until browned.  Remove from skillet and place the breasts into a 9x13 inch baking dish.  Apply the honey mustard sauce to each breast and bake in preheated oven for 20-30 minutes or until the chicken is cooked through. Then layer each breast with mushrooms and bacon.  Sprinkle top with shredded cheese.  Bake another 5 minutes until the cheese is melted.  Garnish with parsley and serve.  Yield: 4 servings.    

Sunday, June 26, 2011

Key Lime Pie Ice Cream with Chocolate

I found this ice cream recipe over at The Hungry Housewife and Leslie claims that this is the most delicious ice cream she has ever tasted in her life!  I'm pretty sure Leslie is from Florida (if you're not and I made that up - I'm so sorry!) where they are known for their key limes, so I figured she would know what good key lime ice cream tasted like.  

I figured this would be the perfect dessert to bring to our Father's Day dinner.  It was a stormy day here in Utah and we ate some AMAZING chili and this ice cream was the perfect palette cleanser after that.  It took away that slight tingle your tongue has from the spicy chili.  

I must admit the first bite I took of this ice cream, I couldn't decide if I liked it or not?  It was extremely limey.  So, I ate a few more bites, then a few more and a few more and it got better with each and every bite.  I do think the chocolate is a key ingredient, it helps cut that "bite" you get from all that tartness from the limes.  I ended up really liking this ice cream.  It is light and refreshing.  The flavor almost reminds me of lime sherbet?  If you have any key lime lovers you should really make them this ice cream.  This is a great Summer treat!
Key Lime Pie Ice Cream with Chocolate
adapted from: The Hungry Housewife

1 1/2 c. whole milk
3/4 c. key lime juice, fresh or bottled
1/2 c. heavy cream
1 (14 oz.) can sweetened condensed milk
pinch of salt
zest of 2 limes
3 oz. semisweet chocolate chips
3 sheets plain or honey graham crackers

In a large bowl, stir together the milk, key lime juice, heavy cream, sweetened condensed milk and salt.  Cover and place in the fridge for two hours or until the mixture is cold.  Pour into your ice cream maker and make according to manufacturers directions.  Minutes before the ice cream is done add the lime zest, chocolate chips and broken up graham crackers.  Remove from your ice cream makers bowl and place in a freezer safe container.  Place in freezer until firm.  Notes: this recipe completely fills a 1 1/2 quart ice cream maker while churning, especially when you add the chocolate chips and graham crackers.  

Thursday, June 23, 2011

4th of July Cupcakes

4th of July will be here before we know it!  It is time to start planning a menu.  If you don't already have a dessert planned, these cupcakes would be great.  Individual sized portions and no plates or utensils needed.  I saw this great idea awhile back over at Hoosier Homemade for some New Years Eve cupcakes.  When I saw her picture, I immediately thought of 4th of July.  So, I waited and waited until it was finally time to give these a try.  All you do is melt some hard candy and cut with a star cookie cutter.  Simple as that.  
1.  Buy a package of Jolly Rancher snack size candy stix.  Take out all of the red and pink candies.  The red and pink both looked the same color once they were melted.   
2.  Unwrap a piece of candy and place on a greased piece of foil over a baking sheet.  I only had one star cookie cutter, so I had to do one at a time.  If you have multiple cookie cutters, you could melt as many pieces as needed.  One candy was perfect for one star.  Place in a preheated 350 degree oven until melted, about 2-3 minutes.   
3.  Remove from oven and press your greased star cookie cutter into the melted candy.  Let harden, a few minutes.  (A faster way to go about it is to have two pieces of foil and when you take one out of the oven and press the cookie cutter in to it; set it aside and let harden for a few minutes while you melt another candy on the 2nd piece of foil.  By the time the new piece is melted the first piece will be hardened).  
4.  Peel candy off of foil and break off excess pieces.  Gently press star out of cookie cutter and set aside.  Repeat with remaining candy.  Don't worry if some of the edges break off the star, you can just stick the broken side into the cupcake.  The better your cookie cutter is greased, the better the stars come out.

Decorate as desired!  I would add the stars only a few hours before serving, because if they sit too long in the frosting, they will start to "melt" into the frosting and you end up with watermelon or cherry flavored frosting.   

Vanilla Bean Cupcakes

3 c. cake flour
1 Tbl. baking powder
1/2 tsp. salt
1 vanilla bean, split lengthwise
16 Tbl. unsalted butter, softenend
2 c. sugar
5 large eggs, room temperature
1 1/4 c. buttermilk, room temperature
1 Tbl. vanilla extract

Preheat oven to 350 degrees.  Line 2 cupcake pans with paper liners.  Combine cake flour, baking powder and salt; whisk and set aside.  Add the butter to an electric mixer fitted with the paddle attachment.  Scrape the vanilla bean seeds into the bowl.  Beat on medium-high for 3 minutes, until light and creamy.  Scrape down the bowl and beat one more minute.  Add the sugar, 1/4 cup at a time, beating one minute after each addition, mix in eggs, one at a time until incorporated.  Combine the buttermilk and vanilla.  With mixer on low, add dry and wet ingredients alternately, mixing just until incorporated.  Scrape bowl and mix a few more seconds.  DO NOT OVERMIX.  Divide batter between liners, filling 2/3 full.  Bake 18-22 minutes or until toothpick comes out clean.  Frost cooled cupcakes.  Yield: approximately 30 cupcakes.

Jenn's Notes:  I made a half of a batch of these cupcakes.  The batter is thick and creamy and they bake up beautifully, perfectly round on top.  I baked mine for 20 minutes.  With half a batch, I got 19 cupcakes.  The first night, they were extremely light and fluffy and had amazing flavor.  The 2nd day, they were slightly more dry, but with the frosting on top, they were still delicious.  They have really really good flavor.  I used vanilla bean paste instead of a vanilla bean. 

White Frosting
from: Jenn@eatcakefordinner

1 c. shortening
2-3 tsp. clear vanilla extract
1 tsp. butter extract
1/4 tsp. almond extract   
pinch of salt
4 Tbl. of water or more if needed 
5 c. powdered sugar

Beat shortening until fluffy.  Add vanilla extract, butter extract, almond extract and salt and beat until blended.  Slowly add powdered sugar, one cup at a time, and beat until combined.  Add water as need, to reach desired consistency.  Beat until smooth and fluffy.  The amount of cupcakes this will frost depends entirely on how much you put on each cupcake.  I tend to put a lot of frosting on my cupcakes and I can get about 24-30 cupcakes frosted.  If you end up with 36 cupcakes, you might be slightly short and you might want to add one more cup of powdered sugar to be safe (or just use less frosting per cupcake).            

Sunday, June 19, 2011

Cheesy Bacon Stuffed Potatoes

I saw these on a recent episode of Paula Deen and I am such a sucker for a good potato (and for Paula Deen!), so of course I had to try them.  She said that these might be the best she has ever had?  All I knew was if they tasted anything like my favorite twice baked potatoes then they would be amazing.  

Well, my friends, they were AMAZING.  They do take slightly more planning than my other recipe, because you have to roast some garlic a head of time, but oh it is soooooooo worth it.  Paula used Yukon Gold potatoes and made these bite size, but my grocery store didn't have any Yukon Golds, so I used smaller Russet potatoes.  They are so good and I savored every last bite.  The roasted garlic is a must.  It gives them a nice undertone of garlic, but not overpowering.  Enjoy!
Cheesy Bacon Stuffed Potatoes
adapted from: Paula Deen

2 Lbs. Yukon Gold potatoes
8 oz. cream cheese, softened
1 c. sour cream
1/2 c. cooked bacon
2 tsp. roasted mashed garlic
1 1/2 tsp. salt
1/2 tsp. black pepper
1/4 c. grated Cheddar cheese
1/4 c. grated Monterey cheese
3 Tbl. chopped green onion, opt.

Preheat oven to 400 degrees.  Line a baking sheet with foil.  Boil potatoes until tender, about 8 minutes.  Drain and let cool.  Cut in half crosswise.  Cut a thin slice off the round end, so it will stand up-right.  Scoop out pulp, leaving a 1/4 inch border around the edge.  Combine with all ingredients, reserving 1/4 cup bacon for topping.  Spoon mixture into potato shells and place on baking sheet.  Top with remaining bacon.  Bake about 20 minutes.  Garnish with green onions and reserved bacon.  Yield: 2 dozen appetizer servings. 

Jenn's Notes:  I used small Russet potatoes and baked them in the oven for about and hour, until then were tender (instead of boiling them).  I let cool slightly, then I cut in half lengthwise and scooped out the pulp and combined with the remaining ingredients.  I just squeezed the roasted garlic right into my bowl.  I also added a little seasoned salt to mine and used less regular salt.  I stirred all the ingredients together and left it somewhat chunky.  If you want it to be smooth, you could always mash everything together with a potato masher. I did not garnish mine with green onions.

How to roast garlic:  Preheat oven to 400 degrees.  Remove several layers from the garlic head.  Using a sharp knife, cut off the top, exposing the garlic.  Place in foil.  Drizzle with a little olive oil and season with a little salt and pepper.  Seal tightly with foil and bake 30-35 minutes.  Here is a great blog that explains how to roast garlic.                

Thursday, June 16, 2011

New York Times Chocolate Chip Cookies

I think I might have been the last person left in blog-land that hadn't made these cookies yet.  I see them everywhere I go and most of the blogs claim that they are THE BEST EVER.  Did they live up to the hype?  You'll have to decide for yourself.  I have tried so many different recipes, like this one and this one and I always seem to like each and every one in some way.  I thought these New York Times cookies were really good.  They were soft, chewy, buttery and they melted in your mouth.  My friend told me they were in her top 3!  I loved the texture of them and the flavor was good, but I really LOVE the flavor of this recipe.  If I could somehow combine the two?  I might just have to start experimenting!!  
New York Times Chocolate Chip Cookies
adapted from: here and a million different blogs

2 c. minus 2 Tbl. (8 1/2 oz.) cake flour
1 2/3 c. (8 1/2 oz.) bread flour
1 1/4 tsp. baking soda
1 1/2 tsp. baking powder
1 1/2 tsp. coarse salt
2 1/2 sticks (1 1/4 c.) unsalted butter, softened
1 1/4 c. (10 oz.) light brown sugar
1 c. plus 2 Tbl. (8 oz.) granulated sugar
2 large eggs
2 tsp. pure vanilla extract
1 1/4 lbs. chocolate chips

Sift flours, baking soda, baking powder and salt into a bowl.  Set aside.  Using a mixer fitted with a paddle attachment, cream butter and sugars together until very light and fluffy, about 5 minutes.  Add eggs, one at a time, mixing well after each addition.  Stir in the vanilla.  Reduce speed to low and add dry ingredients and mix until just combined, 5-10 seconds.  Drop chocolate pieces in and incorporate them without breaking them.  Press plastic wrap against dough and refrigerate for 24-36 hours.  Dough may be used in batches and can be refrigerated for up to 72 hours.  When ready to bake, preheat oven to 350 degrees.  Line baking sheet with parchment paper or spray with cooking spray.  Use a small cookie scoop and drop dough onto baking sheet.  Bake until golden brown, but still soft, about 12-13 minutes.  Cool on baking sheet for 10 minutes then transfer to rack and cool completely.  Repeat with remaining dough or reserve dough for baking the next day.  Yield: 4 dozen cookies.

**Jenn's Notes: I baked one batch of cookies the first night, right after I finished mixing them and they were yummy.  Then, I baked the rest after the 24 hour chill time.  I tasted one from the first night and one from the 2nd night side by side and they tasted the same to me?  So, if I was to make these again, I wouldn't bother with the chill time.  However, I read on several blogs that something magical happens after the 24 hours and they taste way better?  So who knows?     

Tuesday, June 14, 2011

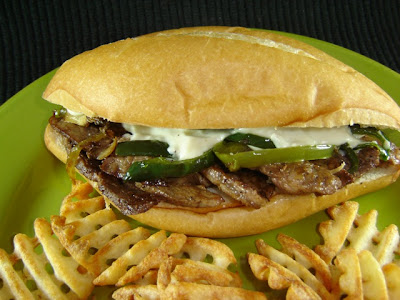
Bobby's Philly Cheesesteak

This sandwich was sooooooooo GOOD, my stomach is growling just thinking about it.  I really really wish I was eating it again right now.  This recipe is from none other than Bobby Flay!  I have become a big fan of his lately, because I have LOVED every recipe I have tried out of the Throwdown with Bobby Flay Cookbook.  I almost took that cookbook back, because it was like the fourth one I bought within 30 days, but I am SO glad I didn't take it back, because I really do LOVE it.  

Anyway,  This sandwich was really really good.  The steak was amazing.  I used two, medium-sized (not sure the weight) New-York strips and had plenty left over.  One steak is more than enough for two sandwiches.  New York strips can be pretty pricey, but wait for them to go on sale and then try this recipe, because you will not be disappointed.  The Provolone sauce was so thick and creamy and delicious.  I think Provolone might even be my new favorite cheese?  If you don't feel like making the sauce, it would be just as good if you just melt a piece (or two or three) of Provolone over the meat and veggies.  You will LOVE this cheesesteak!

Philly Cheesesteak
adapted from: Bobby Flay

3 Tbl. unsalted butter
1 Tbl. canola oil
2-3 onions, halved and thinly sliced
kosher salt and freshly ground black pepper
4 Tbl. olive oil, plus more for cooking the steak
2 poblano chiles, thinly sliced
2 green bell peppers, thinly sliced
1 1/2 lbs. mushrooms, coarsely chopped
1 (2 lb.) New York strip loin, placed in the freezer for 30               minutes, then very thinly sliced
6-8 hoagie rolls
Provolone sauce

Heat 2 Tablespoons of the butter and the canola oil in a large saute pan over medium heat.  Add the onions, season with salt and pepper and cook, stirring occasionally, until soft; add the poblanos and green peppers and saute until tender, about 5 minutes.  Season with salt and pepper. Remove veggies from pan and set aside.  Heat another Tablespoon of butter and 2 Tablespoons olive oil in skillet; add the mushrooms and cook until they are golden brown, about 5-8 minutes.  Remove mushrooms from pan and add to other veggies.  Drizzle pan with a little olive oil.  Season the meat with salt and pepper and cook in batches until just cooked through, about 45 seconds per side.  Place several slices of the meat on the bottom half of each roll, spoon some of the cheese sauce over the meat and top with the vegetables.  Serves: 6-8.   

Provolone Sauce:
1 Tbl. unsalted butter
1 Tbl. all-purpose flour
2 c. milk  
2 c. grated Provolone cheese
1/4 c. freshly grated Parmesan cheese
1 tsp. kosher salt
1/4 tsp. freshly ground black pepper  

Melt the butter in a medium saucepan over medium heat.  Whisk in the flour and cook for 1 minute.  Slowly whisk in the milk, increase the temperature to high and cook, whisking constantly until thickened, about 4-5 minutes.  Remove from the heat and whisk in the Provolone, Parmesan, salt and pepper.  Serve warm. 

Monday, June 13, 2011

Spicy Honey Chicken

This recipe came from Our Best Bites and I had high hopes for this one, because they said it is one of their families favorites and that it is one of their most popular recipes on their blog.  However, I only thought it was good, not amazing.  It is probably all my fault that I didn't love it, because I used chicken breasts instead of thighs and I cooked it on the George Foreman instead of on the BBQ.  They flat out say that it won't be as good if you don't use thighs and you know how much better things taste if you grill them.  Mine ended up just tasting like a taco-seasoned chicken breast?  I couldn't taste much of the honey glaze, but it might have been because I was expecting it to taste like these enchiladas and it did not?  I will be trying this chicken again, but I think I will try the glaze from these enchiladas and see how it turns out.  I used two chicken breasts and cut the rub and glaze recipe in half.  

Spicy Honey Chicken 
adapted from: Our Best Bites  
(Printable Recipe)

8 boneless, skinless chicken thighs (about 2 lbs.)
   (thighs taste better in this recipe than breasts)
2 tsp. vegetable oil


Glaze:
1/2 c. honey
1 Tbl. cider vinegar


Rub:
2 tsp. granulated garlic
2 tsp. chili powder
1/2 tsp. onion powder
1/2 tsp. coriander
1 tsp. kosher salt
1 tsp. cumin
1/2 tsp. chipotle chili powder


Preheat grill to medium-high heat or about 400 degrees.  Combine the rub ingredients in a small bowl.  Trim any visible fat off the chicken thighs, rinse and pat dry with a paper towel.  Drizzle oil over chicken and rub it in with your hands.  Rub the spice rub into the chicken thighs.  Grill for 3-5 minutes on each side.  For the glaze: while chicken is cooking warm honey in the microwave for about 15 seconds.  Whisk in vinegar.  Reserve 2 Tbl. glaze and brush the rest on the chicken in the final moments of cooking.  Remove chicken from the grill and allow to stand 3-5 minutes.  Drizzle reserved 2 Tbl. of glaze over the chicken while it's standing.  Serves: 4-6.

Saturday, June 11, 2011

Cheesecake Cookies

A soft cookie rolled in graham cracker crumbs filled with a light lemony cheesecake, can I just say yum!!!

I had one package of graham crackers leftover from these S'mores Cookies and some lemons leftover from this Olive Garden Lemon Cream Cake, so there wasn't a better time to make these cookies.  

I tasted these cookies the night I made them, and to be honest, they didn't impress me.  However, I put them in an air-tight container and refrigerated overnight and tasted one the next day and they were YUMMY!  I sent some home with my friend and her family loved them too!  
Cheesecake Cookies
adapted from: April W.

Cookie:
1 c. unsalted butter, softened
4 oz. cream cheese, softened
1 c. sugar
1 egg
1 tsp. grated lemon zest
1 Tbl. fresh lemon juice
2 1/4 c. all-purpose flour
1 tsp. baking powder
pinch of salt
1/2 c. graham cracker crumbs


Filling:
4 oz. cream cheese, softened
1/2 tsp. grated lemon zest
1 egg yolk
1 Tbl. milk
2 Tbl. sugar

For the cookies: Cream together the butter, cream cheese and sugar.  Add the egg, lemon zest and lemon juice.  Combine the flour, baking powder and salt and mix into the creamed mixture.  Combine thoroughly.  Chill dough for one hour.  To make the filling:  Combine cream cheese, lemon zest, egg yolk, milk and sugar; beat until smooth and creamy.  Refrigerate until ready to use.  When dough is chilled, roll into small balls.  Roll balls in graham cracker crumbs and place on lightly greased cookie sheet.  Indent the top of the cookies using your clean thumb.  Fill cookies with about 1/2 tsp. or so of the filling.  Bake at 350 degrees for 18-20 minutes.  Yield: about 3 dozen cookies.    

Wednesday, June 8, 2011

Banana Streusel Bundt Cake

This cake recipe is courtesy of my friend Nicole!!  It is sooooo tasty!  The other day, she brought me a piece of cake to try and she said "Now, keep in mind this is sugar free," so I figured it was going to have that weird taste to it, you know what I mean?  To my surprise, it was actually DELICIOUS.  I could not tell it was sugar free.  She used a sugar free cake mix, sugar free box of pudding and brown sugar Splenda.  

I was so impressed with her cake that I went to the store on my lunch break and made it that night.  However, the store I went to, the sugar-free cake mixes were two and a half times as much as a regular cake mix, so I ended up buying regular, but I did use a sugar free pudding mix.  It was so good that I didn't even need to put glaze on top (which is a rare thing in my kitchen).  
It was moist and had the perfect banana flavor, mixed with the streusel swirl - INCREDIBLE!!  By the way, I have recently found the sugar free cake mixes for only about 75 cents more than a regular cake mix, so I am going to pick up a few of those to keep on hand for when I make this cake.  Why eat those extra calories when you don't need to.  Either way you choose to make this cake, it will be yummy.
Banana Streusel Bundt Cake
adapted from: Nicole W.

1 yellow cake mix
1 small box instant banana pudding
1 c. sour cream (I used non-fat plain yogurt)
4 eggs
3/4 c. vegetable oil
1 c. water

Streusel Swirl:
1 c. light brown sugar
1 tsp. nutmeg
2 tsp. cinnamon

Preheat oven to 350 degrees.  Combine cake mix, pudding mix, sour cream or yogurt, eggs, oil and water and mix until thoroughly combined.  Pour half of the batter into a greased and floured bundt pan.  Combine brown sugar, nutmeg and cinnamon (adjust measurements to taste) and sprinkle half over the batter. Top with remaining cake batter and top with remaining streusel.  Use a knife and swirl top of cake slightly.  Bake for about 45 minutes or until done.  

Note: This cake can easily be made almost sugar free with a sugar free cake mix, sugar free pudding mix and brown sugar Splenda.  

Sunday, June 5, 2011

Waffle House Waffles

I have never been to a Waffle House and I have no idea where one even is, but I do know - I love waffles!  I already have a go-to waffle recipe that is amazing.  I haven't posted it yet, but I will one day.  Even though I have a perfect recipe, I still like to try other versions.  This recipe has more ingredients than your average waffle recipe.  Instead of just adding milk, this one calls for milk, buttermilk and half-and-half.  I already had buttermilk on hand, leftover from my favorite biscuits and I had purchased some half-and-half to use in a pot-pie recipe.  So, make sure you have other uses for those ingredients, so you don't end up buying a whole container and letting it go to waste.

I thought these waffles were pretty good.  I wish they would have gotten more "crisp" on the outside, like my favorite waffles do, but the flavor was pretty good and they did their job in satisfying my craving and filling me up.  After starting the recipe, I got to the part where is says to chill the batter in the refrigerator for 24 hours?  Oops, a little late for that.  I wonder if it really makes much of a difference?
Waffle House Waffles

1 1/2 c. all-purpose flour
1 tsp. salt
1/2 tsp. baking soda
1 egg
1/2 c. + 1 Tbl. sugar
2 Tbl. butter, softened
2 Tbl. vegetable shortening
1/2 c. half-and-half
1/2 c. milk
1/4 c. buttermilk
1/2 tsp. vanilla extract

Combine flour, salt and baking soda in a medium bowl.  Lightly beat the egg in another medium bowl.  Add the sugar, butter and shortening and mix well with an electric mixer until smooth.  Add the half-and-half, milk, buttermilk and vanilla.  Add the wet ingredients to the dry ingredients while beating.  Mix only briefly.  It is okay if there are small lumps in the batter, because over beating could produce tough waffles.  Cover and refrigerate overnight.  You can use the batter right away, but a good 12 hour chill makes a better batter.  If you are using right away, at least let sit for 15-20 minutes so it can thicken a bit.  Heat waffle iron.  Add about 1/2 cup batter or so per batch (depending on the size of your waffle iron).  Yield: about 6 double waffles.  

Friday, June 3, 2011

Olive Garden Lemon Cream Cake

This was the first recipe I tried out of my new cookbook.  My friend, Nicole, told me that Olive Garden's Cream Cake is to die for and she isn't even a big lemon fan!  I have no idea if this cake tastes like the real Olive Garden cake, because I have never had it.  I should have given a piece to Nicole to try, but I didn't think about that until now and this cake is long gone!!  However, the Top Secret Restaurant Recipes website has really good reviews for this cake.  

The recipe said to combine the vanilla crumb topping ingredients and press it into the sides of the finished cake, but that sounded so strange to me, because I would feel like I was eating straight butter?  So, I decided to add my crumb topping to one of the cakes before I baked it.   That way, while it baked, it would create a nice, cooked, crispy topping, kinda like a streusel.  Honestly, I don't think the crumb topping did much for this cake and I wouldn't add it next time.  It tasted great with just the white cake mixed with the lemon cream filling. Yum!  If you have had the original Lemon Cream Cake and happen to try this recipe.  Let me know if it compares to the real deal!!
Olive Garden Lemon Cream Cake

Cake
1 Betty Crocker white cake mix
1 1/4 c. water
1/3 c. vegetable oil
3 egg whites

Note: These measurements are based on a Betty  Crocker cake mix.  If you chose to use a different brand, the ingredients and measurements might be different.

Lemon Cream Filling
8 oz. cream cheese, softened
2 c. powdered sugar
3 Tbl. lemon juice
1 c. heavy whipping cream


Vanilla Crumb Topping
1/2 c. all-purpose flour
1/2 c. powdered sugar
1/4 c. cold butter
1/2 tsp. vanilla extract

Make white cake according to the directions on the box.  Divide batter between two 9'' cake pans.  Bake according to box directions.  Remove from oven and allow to cool in pans for 15 minutes.  Then, invert cakes to cooling rack and cool completely.

Make the lemon cream filling by mixing  cream cheese and powdered sugar in a medium bowl with an electric mixer until smooth.  Mix in lemon juice.  Whip the cream in a large bowl with an electric mixer on high speed until it forms stiff peaks.  Fold cream cheese mixture with whipped cream.  Stir gently by hand until blended.

Make crumb topping by combining flour and powdered sugar in a medium bowl.  Add butter and dribble in the vanilla extract.  Use your hands or a pastry cutter to mix cold butter into flour and sugar.  Break butter into smaller and smaller pieces as you incorporate it into the dry ingredients.  Be sure not to press the mixture together.  You want to end up with a very crumbly consistency with pieces no bigger than a pea.  

When the cake is cool, spread all but 1/2 cup of the lemon cream mixture onto the bottom half of the cake, then carefully place the top half of the cake over the filling.  Spread remaining filling over the top and sides of the cake.  Sprinkle the crumb topping on top of the cake and press it onto the sides all the way around the cake.  Now chill the cake for at least three hours before you serve it.  When you are ready to dig in, slice cake into 12 slices.  Serve each slice topped with powdered sugar tapped through a strainer.  Serves: 12.  Keep refrigerated. 

Jenn's Notes:  I added a little lemon extract to my filling to give it a little stronger lemon flavor.  I also sprinkled the vanilla crumb topping onto one of my cakes before I baked it, so it would create a nice crispy topping.  After letting the cakes cool completely.  I spread the entire amount of filling onto the bottom cake layer and then refrigerated it for a while, so it would harden slightly and it wouldn't run out the sides when I put the top cake layer on.  It worked beautifully and tasted great.    

Thursday, June 2, 2011

Denny's Club Sandwich

I got a new cookbook . . . . I know . . . . It's like the fourth one in one month. . . . but I just couldn't resist. . . .  

. . . I went to Kohl's the other day.  I usually try to avoid that store, because I NEVER EVER leave without buying something.  Usually something in the kitchen section.  They have soooooo many fun things, but they aren't cheap.  I had some pants I had to return, so of course I couldn't just go straight to the back and return the pants, I had to swing by the kitchen section.  I saw this cookbook sitting on the shelf and I picked it up and flipped through it and I saw quite a few recipes that sounded amazing.  I told myself . . . no, you DO NOT need another cookbook, so I started to lower my hand to put it back on the shelf, then I flipped it over, just to see how much it was . . . I knew it would probably be around $20, but to my surprise it was $5!  I picked it back up, because - come on - anything is worth $5, right?  I also picked up some place mats and a mini dutch oven.  See, I told you that store is dangerous!!!

This sandwich is a copy cat Denny's recipe for their club sandwich.  It is a triple-decker sandwich loaded with turkey, bacon, lettuce and tomato!  It turned out very good.  If you don't want the added slice of bread in the middle, it would taste just as delicious with only two slices.  

Denny's Club Sandwich 

6 slices toasted white bread
Mayonnaise or Miracle Whip
6 oz. deli-sliced turkey breast
4 iceberg lettuce leaves
4-6 slices cooked bacon
4 tomato slices

Spread about 1 1/2 teaspoons Mayo or Miracle Whip on one side of each toasted white bread slice.  Arrange the turkey on one slice of toast.  Tear or fold one iceberg lettuce leaf to fit on the sliced turkey.  Stack on another slice of toast with the Mayo side facing up.  Break 2 or 3 slices of cooked bacon to fit on top of the second slice of toast.  Arrange two tomato slices to fit on top of the bacon.  Tear or fold the second lettuce leaf to fit on top of the tomato.  Top off the sandwich with the last piece of toast turned with the Mayo-coated side facing down.  Pierce the sandwich with four toothpicks between the corners to that when the sandwich is sliced twice from corner to corner with a serrated knife, the toothpicks wind up in the center of each of the four slices.  (I only sliced mine once from corner to corner).  Repeat with remaining ingredients.  Yield: 2 sandwiches.  

Popular Posts

that give mcdonalds coupons and 
breakfast coupons you also can find recipe from